YOU MUST BACKUP BEFORE UPDATING.
WE ARE NOT RESPONSIBLE FOR ANY LOSS.
WE ARE NOT RESPONSIBLE FOR ANY LOSS.
Once you have a fullback, you are also responsible to make sure that every time there is a new release of the theme or plugin, all your customizations (See below, PART 1) or translations (See below, PART 2 & 3) are not affected by the update. In order for you to make this process smooth please make sure you have completed the steps mentioned in PART 1, 2 & 3 if they apply in your case.
PART 1: MOVE CUSTOMIZATION TO CHILD THEME
STEP 1: Make sure Child Theme is installed and active. (If not, see How to install a Child Theme?)
STEP 2: Locate ALL the custom code changes made (either by you, your developer or even by our custom-services team upon your request).
STEP 3: Move all custom code changes to the child theme.
PART 2: MOVE THEME TRANSLATION TO CHILD THEME
For a step-by-step instruction on how to move Translation to the Child Theme, go here.
PART 3: BACKUP PLUGIN TRANSLATION FILES
STEP 1: Go to /wp-content/plugins/listingpro-plugin/languages
STEP 2: Download and save .po and .mo
The .po file name will be different based on the language, example for spanish it will be listingpro-plugin-es_ES.po.
After updating the theme make sure to restore the .po and .mo file in the same location and go to WP Admin > Loco Translate > Plugins > ListingPro Plugin, select the language translation file and click Sync and then Save
PART 4: BACKUP FULL THEME & PLUGIN
Backup via cPanel (Recommended)
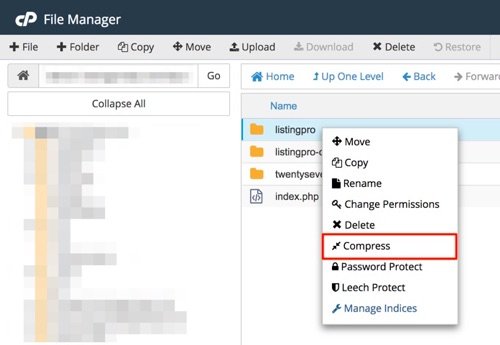
STEP 1: Log into cPanel > File Manager.
STEP 2: Go to wp-content/themes/
STEP 3: Right-click listingpro, and then click Compress

STEP 4: Next, right-click listingpro-child (if applied in your case), and then click Compress
STEP 5: Finally, go to wp-content/plugins/
STEP 6: Right-click listingpro-plugin, and then click Compress
PART 5: SELECT HOW YOU LIKE TO UPDATE
There are primarily two ways to update our WordPress themes to the latest version, choose one option.
| [lana_button size=”lg” type=”danger” href=”https://docs.listingprowp.com/dwkb/how-to-auto-update-listingpro-wordpress-theme/”]AUTO UPDATE[/lana_button] | [lana_button size=”lg” type=”success” href=”https://docs.listingprowp.com/dwkb/how-to-manually-update-listingpro-wordpress-theme”]MANUAL UPDATE[/lana_button] |
