How to add a Listing Category?

There are two sets of Categories that can be created, Parent Category and Child Category (Sub-Category), and the listings can be added into those categories.

HOW TO ADD CATEGORY?

STEP 1: Login to WordPress admin dashboard.

STEP 2: Go to Listings > Categories

STEP 3: Enter a Name and Slug

STEP 4: Select Parent Category if creating a Sub-Category.

Description box is for SEO purpose. You need to install an SEO plugin (Example: Yoast SEO) in order for the meta description to activate.

STEP 5: Add Category Icon

For step-by-step instructions on how to add an icon to a Category read  

STEP 6: Add Category Banner.

STEP 7: Assign Category Features.

For step-by-step instructions read How to assign Features to a Category?


The specified features will appear on listing submission page, listing details page and search result page as part of the advanced filter as long as a category is selected.

How to add icons into a Category?

OPTION 1: INSERT BASE64 IMAGE CODE

STEP 1: Go to icons8.

STEP 2: Pick an icon.

STEP 3: Click Generate HTML

STEP 4: Under the Base64 tab, copy only the code for the image src without quotes. (Example: data:image/png;base64…).

STEP 5: Paste the code directly into the Category Icon field.

You can also change the icon’s colors by your need on the Icon8 Website.


OPTION 2: UPLOAD IMAGE ICON

STEP 1: Click Insert Image

STEP 2: Drop image or click  Select Files to upload.

STEP 3: Click Insert into post


How to add Features?

Features allow a business listing owner to present the core value of their business such as amenities or facilities. It unlocks a very powerful option that we will discuss below.

STEP 1: Login to WordPress admin dashboard.

STEP 2: Go to Listings > Features

STEP 3: Enter a Name and Slug

STEP 4: Enter a Feature icon code (Example: fa-address-book).

Currently only FontAwesome icons are supported. A complete list of icon codes can be found here.


How to fix 404 error after theme installation?

The following topics are covered in this knowledge base article.

  • Set the HOME page
  • Set the Permalinks
  • Set page URLs in Theme Options


PART 1. Set the HOME page

STEP 1:  Go to SettingsReading

STEP 2:  Select Home from Frontpage drop-down.
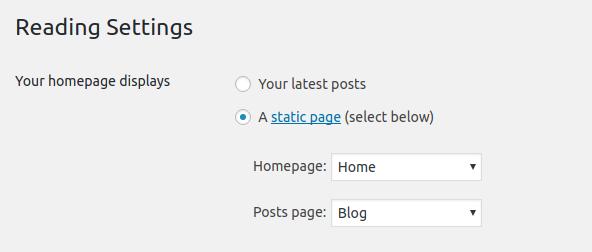
STEP 3:  Click Save Changes


PART 2. Set the Permalinks

STEP 1:  Go to SettingsPermalinks

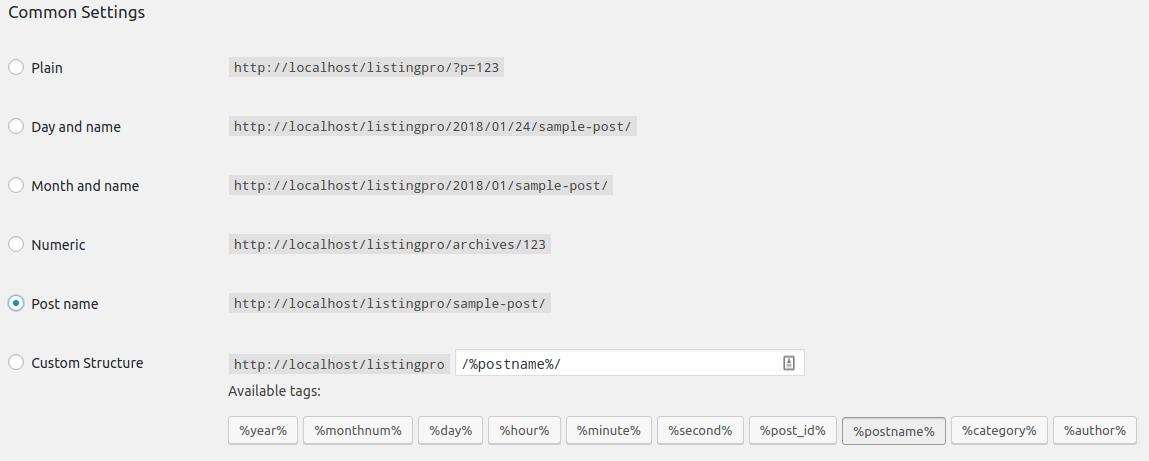
STEP 2:  Select Post name

STEP 3: Click Save Changes


PART 3. Set page URLs in Theme Options

For new users who have recently installed ListingPro, there are some settings that need to take into consideration to avoid any 404 errors or blank images with shortcodes.

STEP 1: Go to the Theme Options > URL Config and check the following details
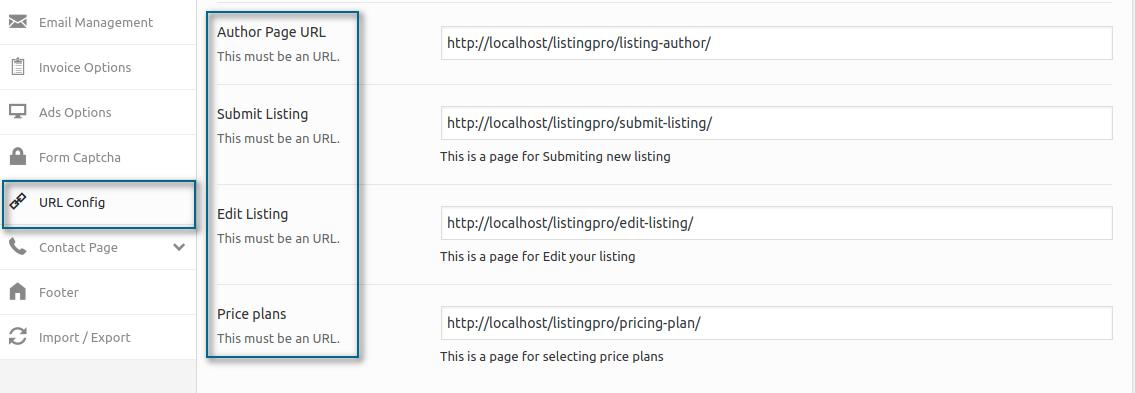
Add the corresponded URLs in this settings, to avoid 404 errors while clicking on these pages, Author Dashboard, Submit Listing, Edit Listing, and Price Plans.

STEP 2: While using the Price plans, make sure that the settings are also configured, Go to Theme Options > Payment Settings > General and check the following details
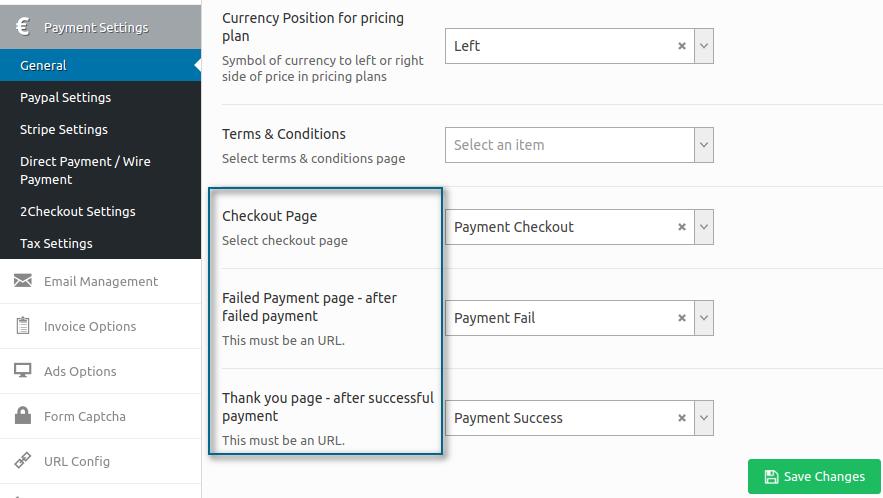
Including these pages from the drop-down, you won’t face any more issues with blank pages showing only a shortcode. Simply add the Payment Checkout, Payment Fail, and Payment Success into the next section.

STEP 3: If you’re facing issues on the homepage, more specifically at the +Add Listing button, simply go to the Theme Options > Payment Settings > General and check the following details
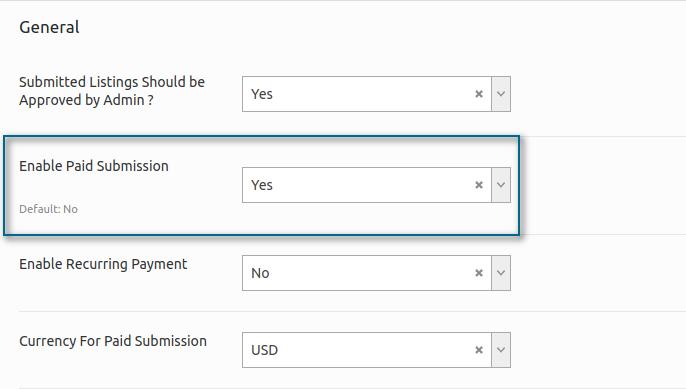
Set the Paid Submission to YES instead of the Default NO. This way, users will be redirected to the Price Plans before submitting a listing into the Directory. If you define this option as NO, users will be able to add listings without any restriction for free.

The Default option is better suited for users who want to grant free access without charging for added listings. Instead, the admin can be monetized by using the Ad Campaign System, when certain users want to leverage their added listings into the Directory.

How to install ListingPro (Plugins + Demo)?

INSTALL PLUGINS + DEMO LISTINGPRO WIZARD

 To auto redirect to Easy Setup Assistant wizard, you need to install and activate ListingPro theme. But if you exited the setup wizard you can always go back to it by navigating to Appearance > Setup Wizard.

STEP 1: Click Let’s Go! to start the Easy Setup Assistant wizard.

STEP 2: Click Continue to installl all required Plugins.

STEP 3: Click Import Content to import Dummy Content.

The above step only imports minimal data.

STEP 4: Click Return to the WordPress Dashboard to return to dashboard.


 Congratulations! Now you have completed Installing Plugins & Importing Demo Content. Next, read How to activate license for ListingPro theme?


What are the server requirements to install ListingPro?

NEED HOSTING FOR LISTINGPRO? We recommend you try Cloudways.

We highly recommend verifying the following on your host. For help contact your hosting company.

Application Minimum Recommended
WordPress 4.5 4.8 or latest
PHP 5.6 7.0 (Stable Only)
MySQL 5.6 (For legacy 4.5.x will work) NA


PHP Configuration Limits:

Application Minimum Recommended
max_execution_time 300 NA
memory_limit 512M 1024M
post_max_size 100M 200M
upload_max_filesize  120M  NA


Required
Cron Job YES
CURL YES


Additional

  • Is SSL Required? YES

Nowadays is highly recommended to include SSL in your domains. Some Cloud Servers and also Hosting Providers, also include SSL Certificates to enable in your Websites. While using ListingPro some settings aren’t required the use of an SSL. Otherwise, some settings like Google Maps, Social Login, Payments, and others may require a Certificate that ensures the Website’s Security. If you don’t know what an SSL is and what it does on your Website, please Read This.

Many issues that you may run into such as; white screen, demo content fails when importing, empty page content and other similar issues are all related to low PHP configuration limits. The solution is to increase the PHP limits. You can do this on your own, or contact your web host and ask them to increase those limits to a minimum as shown above.