Solution:
Is Jetpack plugin is installed and active? If yes, disable Jetpack and test again. In most cases, this should resolve your issue.
Clear cache or disable any cache plugin before testing. If the problem persists open a support ticket.
Explanation:
We don’t recommend or support Jetpack. In the default WordPress System, when you upload an image it resizes the images in several different sizes.
For example, a directory site with 20 Listings will at least have 3 images per listing, which means 60 images, but if you add the multiple resized image which is around 6 per image than the total number will be 360 images. Now if you use Jetpack, all these images will be uploaded to cloud further making things even more complex.
Where as our system does a better job in resizing images, resulting in much fewer images (roughly around 80 images for 20 listings, which is almost 1/5 of what Jetpack creates) and they are all stored locally on your server. This is the recommended method to avoid any issues in long-term.
But if you still want to continue using Jetpack we can provide a fix for you but it’s not 100% guarantee that it will work as expected.
ThemeForest Official Policy regarding what’s included in the support:
Item support does not include services to modify or extend the item beyond the original features, style, and functionality described on the item page. For customization services that will help you tailor the item to your specific requirements, we recommend contacting the author to see if they privately offer paid customization services or check out the great service providers on Envato Studio.
Information! Please, in case of any doubt, access the WP ALL IMPORT Documentation. If you're still facing some difficulties, go to our Support Channel and our Team will help you out with any pending doubts.
Alert! IMPORTANT! Bulk import of ADDITIONAL DETAILS (CUSTOM FIELDS) currently NOT SUPPORTED.
Information! Business Hours can also be imported CSV.
PART 1: INSTALLATION
STEP 1: Login to WordPress admin dashboard.
STEP 2: Go to Plugins > Add New
STEP 3: Search for WP All Import, and click Install Now.
Plugin actual name is Import any XML or CSV File to WordPress.
STEP 4: Click Activate
STEP 5: Go to Plugins > Add New
STEP 6: Click Upload Plugin
STEP 7: Click on Choose File, and upload listingpro-Bulk-import-addon.zip.
Latest listingpro-Bulk-import-addon.zip file is included with the theme bundle under Bulk Importer Add-on folder.
STEP 8: Click Install
STEP 9: Click Activate Plugin
PART 2: IMPORTING LISTINGS (CSV)
STEP 1: Login to WordPress admin dashboard.
STEP 2: Go to All Import > New Import
STEP 3: Select Upload a file or Download from URL
STEP 4: Find CSV file and upload.
To create an import ready file use the following sample CSV template. Click the green button below.
STEP 5: Select New Items > Listings next to Creat new drop-down.
STEP 6: Click on Continue to Step 2
Review the total number of listing and each field to be imported and go to next step.
STEP 7: Click on Continue to Step 3
STEP 8: Drag the fields (Example: title) from the right column (data pulled from imported CSV) into the respective listing fields on the left.
Continue this for all the fields to import. Additional fields such as Tagline, Google Address, Phone, Email, etc will be under Listingpro Add-On.
STEP 9: Under Gallery Images drag the images field (Example: photos) from the right column.
For CATEGORIES
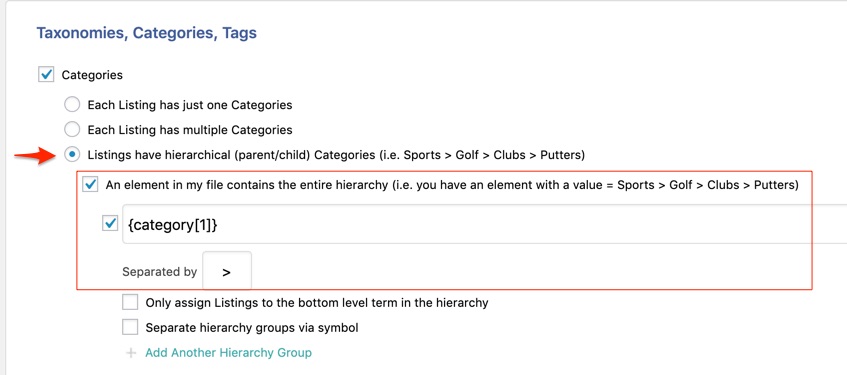
STEP 10: Under Taxonomies, Categories, Tags check Categoriesand drag the categoryfrom the right column.
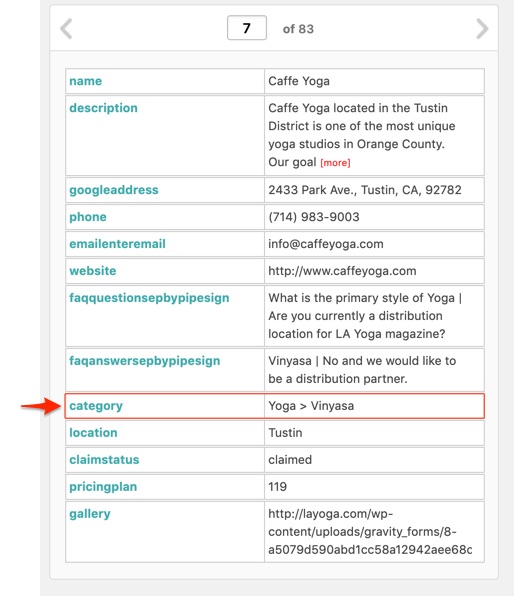
For creating and assigning subcategories, see the screenshots below
For FEATURES
STEP 11: Under Taxonomies, Categories, Tags check Featuresand drag the featurefrom the right column.
For TAGS
STEP 12: Under Taxonomies, Categories, Tags check Tagsand drag the Tagfrom the right column.
For LOCATION
STEP 13: Under Taxonomies, Categories, Tags check Locationsand drag the Locationfrom the right column.
STEP 14: Click on Continue to Step 4
STEP 15: Next to Unique Identifier field, click on Auto-detect
STEP 16: Click on Continue
STEP 17: Click on Continue & Run Import and wait until it says Import Complete!
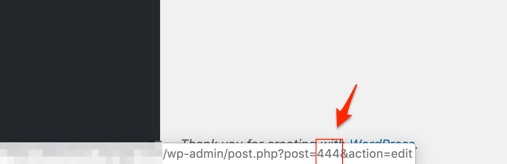
To assign pricing plans as part of the listing import you need the pricing plan id which you can get it by go to wp-admin > pricing plans and if you mouse-over any of the pricing plan you will get the post id which is the pricing plan id. See screenshot below
PART 3: IMPORTING LOCATIONS (CSV)
Locations can be bulk imported as part of the above mention Importing Listing process explained in PART 2 or separately as shown below.
Is your Google Map not showing on listing details after the bulk import? Read this article.
STEP 1: Login to WordPress admin dashboard.
STEP 2: Go to All Import > New Import
STEP 3: Select Upload a file or Download from URL
STEP 4: Find CSV file and upload.
To create a import ready file use the following CSV Template – sample-locations.csv
STEP 5: Select New Items > Listings next to Create new drop-down.
STEP 6: Click on Continue to Step 2
Review the total number of listing and each field to be imported and go to next step.
STEP 7: Click on Continue to Step 3
STEP 8: Drag the fields (Example: title) from the right column (data pulled from imported CSV) into the respective listing fields on the left.
STEP 10: Under Taxonomies, Categories, Tags check Location and drag the locationfrom the right column.
STEP 11: Click on Continue to Step 4
STEP 12: For Unique Identifierfield enter Location.
STEP 13: Click on Continue
STEP 14: Click on Continue & Run Import and wait until it says Import Complete!
Go toListings > Locations to check all the locations from the CSV imported successfully.
PART 4 (Optional): BUSINESS LOGO
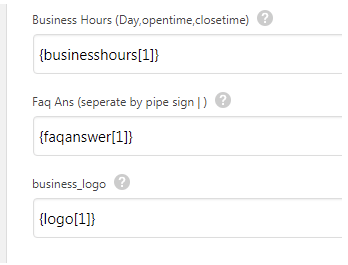
Currently, we do not have an option available for importing the business logo in the CSV file. But here’s an alternative solution available which works for our customers who want to import the business logo.
Before you import logo using ListingPro bulk import addon, please modify the following two files:
This article contains everything you must know about listing Features and it’s broken down into the following topics.
What is listing Features
How and where the listing Features taxonomy is shown
How to add listing Features (Only For Admins)
How to assign Features to a Category (Only For Admins)
Additional FAQs
1. What is listing Features
Listing Features is a Taxonomy. For directories and listing websites it is also known as listing Amenities.
2. How and where the listing Features taxonomy is shown
On the front-end, the Features taxonomy appears in three different places, the Listing Submission Page, Listing Details Page, and Listing Archive Page.
Listing Submission Page
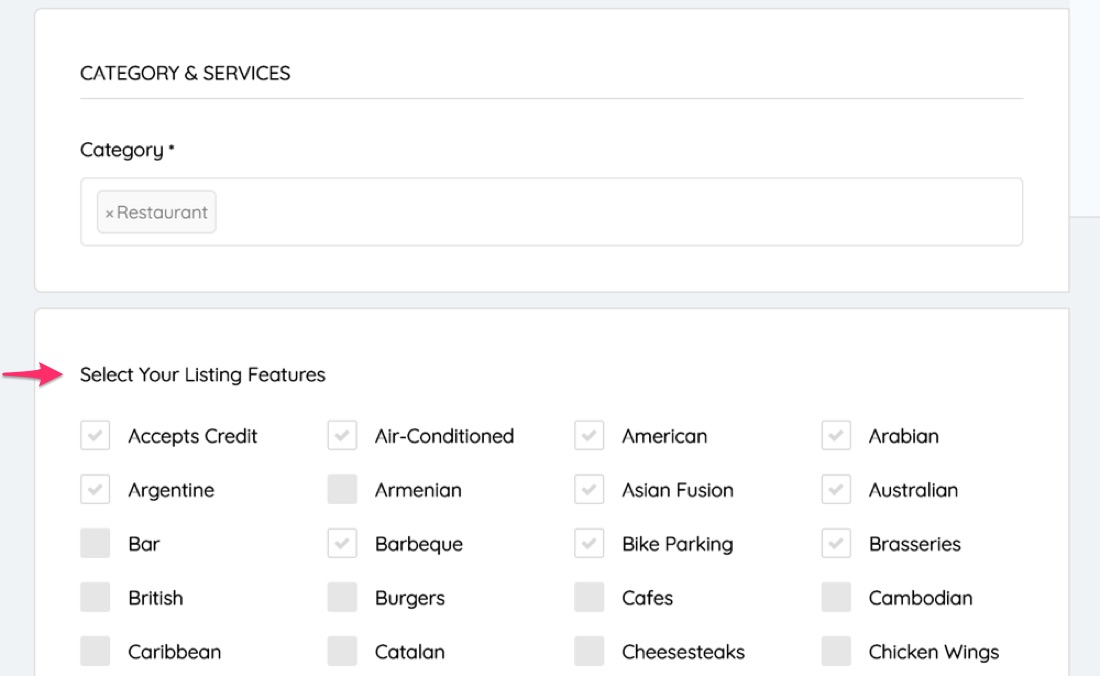
In a front-end listing submission form when a user selects a category (example: Restaurant), a specific set of listing Features (amenities) associated with the category will be offered to the user to make a selection (example: Accepts Credit Cards, Bike Parking, Special, Street Parking, etc).
Listing FEATURES associated with a restaurant category shown on a front-end listing submission form.
Listing Details Page
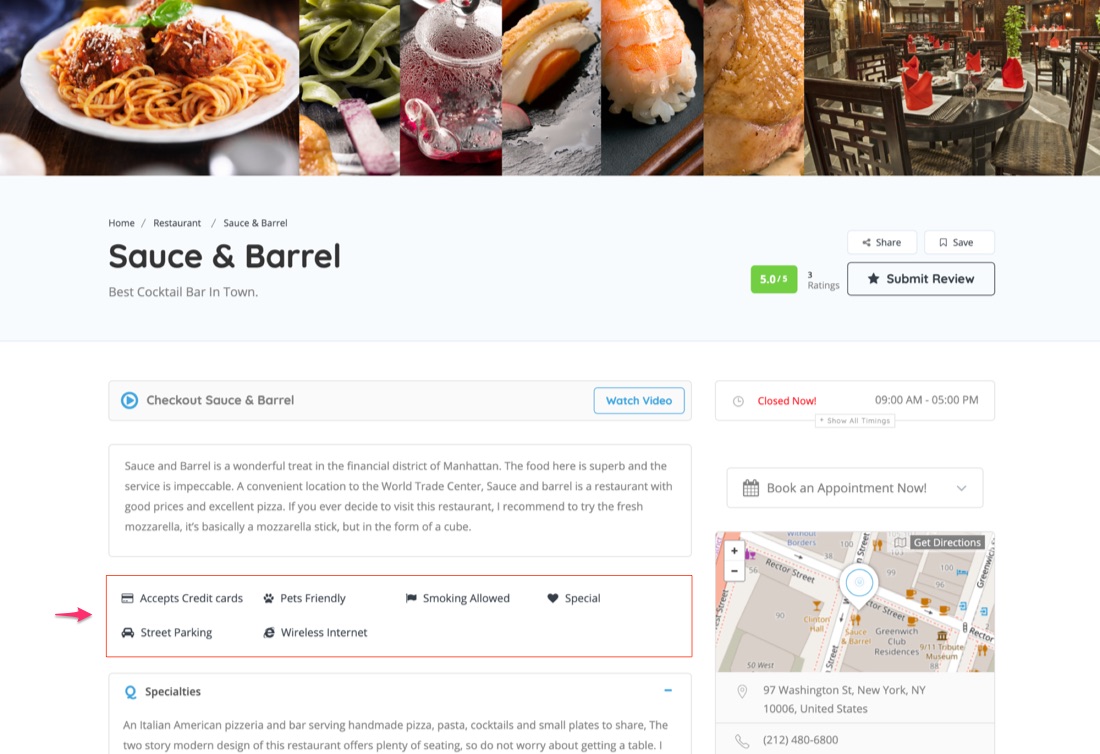
On the listing details page, the FEATURES appear right below the description box with their respective icon if selected. This gives visitors an instant insight into the most valuable information about the business.
This is how FEATURES appears on the listing archive (search results) page.
Listing Archive (Search Results) Page
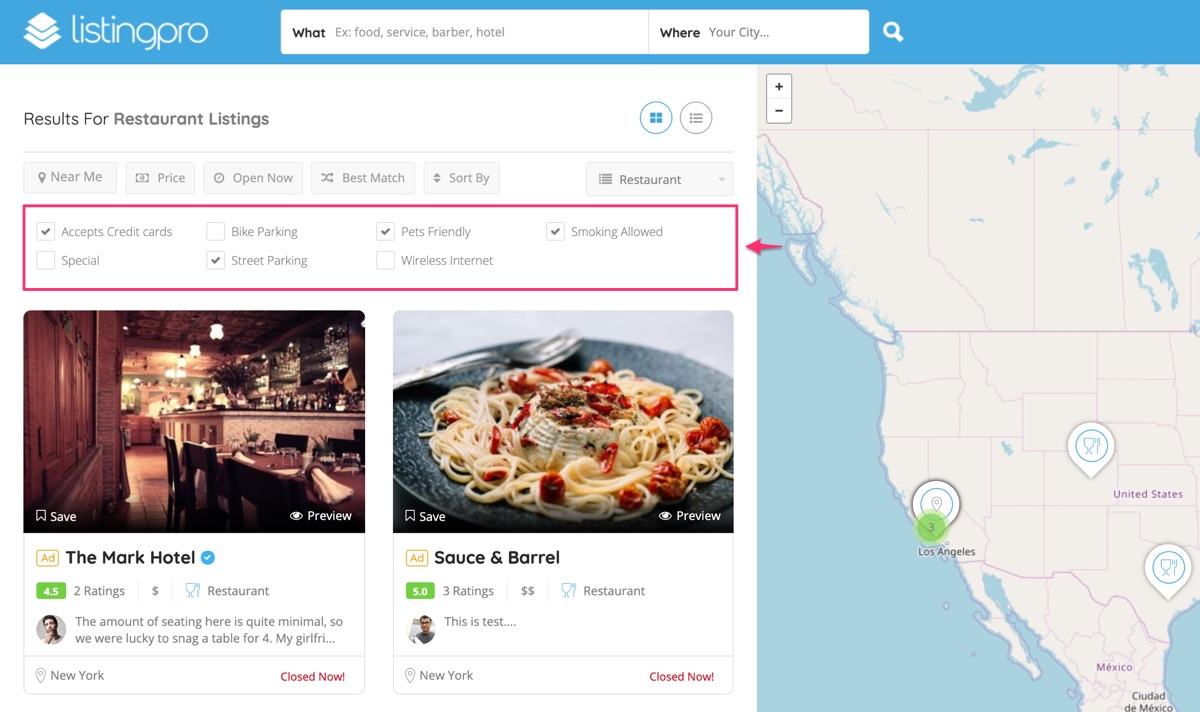
On the listing archive page, the Features appears right below the filter, once a category (example: Restaurant) is selected. This enhances the search result filtering capabilities by allowing users to select multiple features to narrow down the result.
This is how FEATURES appears on the listing archive (search results) page.
3. How to add listing Features (Only For Admins)
Features allow a business listing owner to present the core value of their business such as amenities or facilities. It unlocks a very powerful option that we will discuss below.
STEP 1: Login to the WordPress admin dashboard.
STEP 2: Go to Listings > Features
STEP 3: Enter a Name and Slug
STEP 4: Enter a Feature icon code (Example: fa-address-book).
Currently only FontAwesome icons are supported. A complete list of icon codes can be found here.
4. How to assign Features to a Category (Only For Admins)
Features can be very useful as you can assign a unique set of listing Features to each Primary or Sub-Category.
STEP 3: Select all the features associated with the category.
If no features are available to select from the drop-down, then you must first add new features as shown above.
5. Additional FAQs
Can I use features to search listings?
Listing Features (amenities) is actually a function of Advanced Filter and not the Search itself. When a user searches using the WHAT search field, the query does not run to lookup in listing Features. Only after the search is finished displaying the results on the archive page, users can further filter using listing Features to narrow the results by first selecting a category, and all the associated listing Features will be shown for the users to select.
What is the difference between listing Tags vs listing Features?
There are some misconceptions about the differences between tags and features. This is very common and in a summarized way, let’s cover the differences and how you can benefit from both of them in your directory.
Features are those that we really love in our directory. After creating our list of categories and subcategories, we’re more than ready to implement some interesting features that represent each of these categories to be shown on the submit listing page and on the listing details page.
Tags (Keywords), on the other hand, come to enhance the searchability to bring the matched words and relevant listings based on the typed words in the Search Bar.
These Tags/Keywords works as a benefit to improve search metrics and filter only the relevant listings in your directory. While used correctly, the flexibility available is indescribable.
Using Tags/Keywords can improve searches by features. So, only use the words that best emphasize your directory niche, the categories, the features within these categories. Choosing it wisely those words will impact positively more than 80% of the user flexibility in search results.
Using Features works in a different way, but users can still click on the specific Feature and the search result page will refresh based on the clicked Feature described in the Listing Detail Page. Also, Features can be selected to show relevant Listings including those specific Features requested by the user. Tags/Keywords can also have the same words as included for Features within categories and subcategories. Showing it wisely will increase the Search Type as well.
(Last Updated: August 17th, 2020) ListingPro 2.5 full translation is now available only for the following languages:
Arabic
Albanian
French
German
Greek
Italian
Portuguese
Spanish
Go download your language translation from Github. For more instructions on how to download go here.
These instructions are for SINGLE LANGUAGE translation and also can be applied to ENGLISH language users who want to just CHANGE TEXT (Example: Add Listing to Submit Listing). ENGLISH language users shouldn’t get confused with the word Translation here, as this is the only way to change all default text like many other themes.
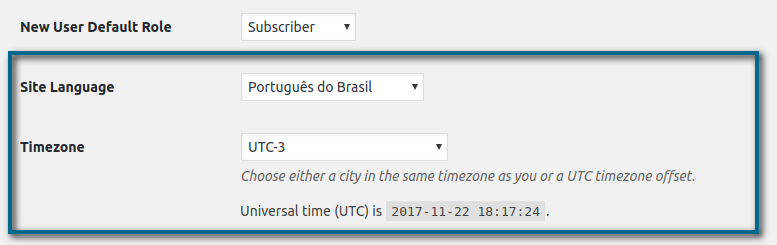
Before proceeding you must check the selected default language from WordPress Dashboard Settings > General > Site Language that matches the language which you are translating in Loco Translate. For example, if you are translating the site into Brazilian Portuguese then make sure the Site Language, Português (Portuguese) is selected.
The above language should match the language (Portuguese) you are planning to create or have already created in Loco Translate.
PART 1: INSTALL LOCO TRANSLATE
STEP 1: Login to WordPress admin dashboard.
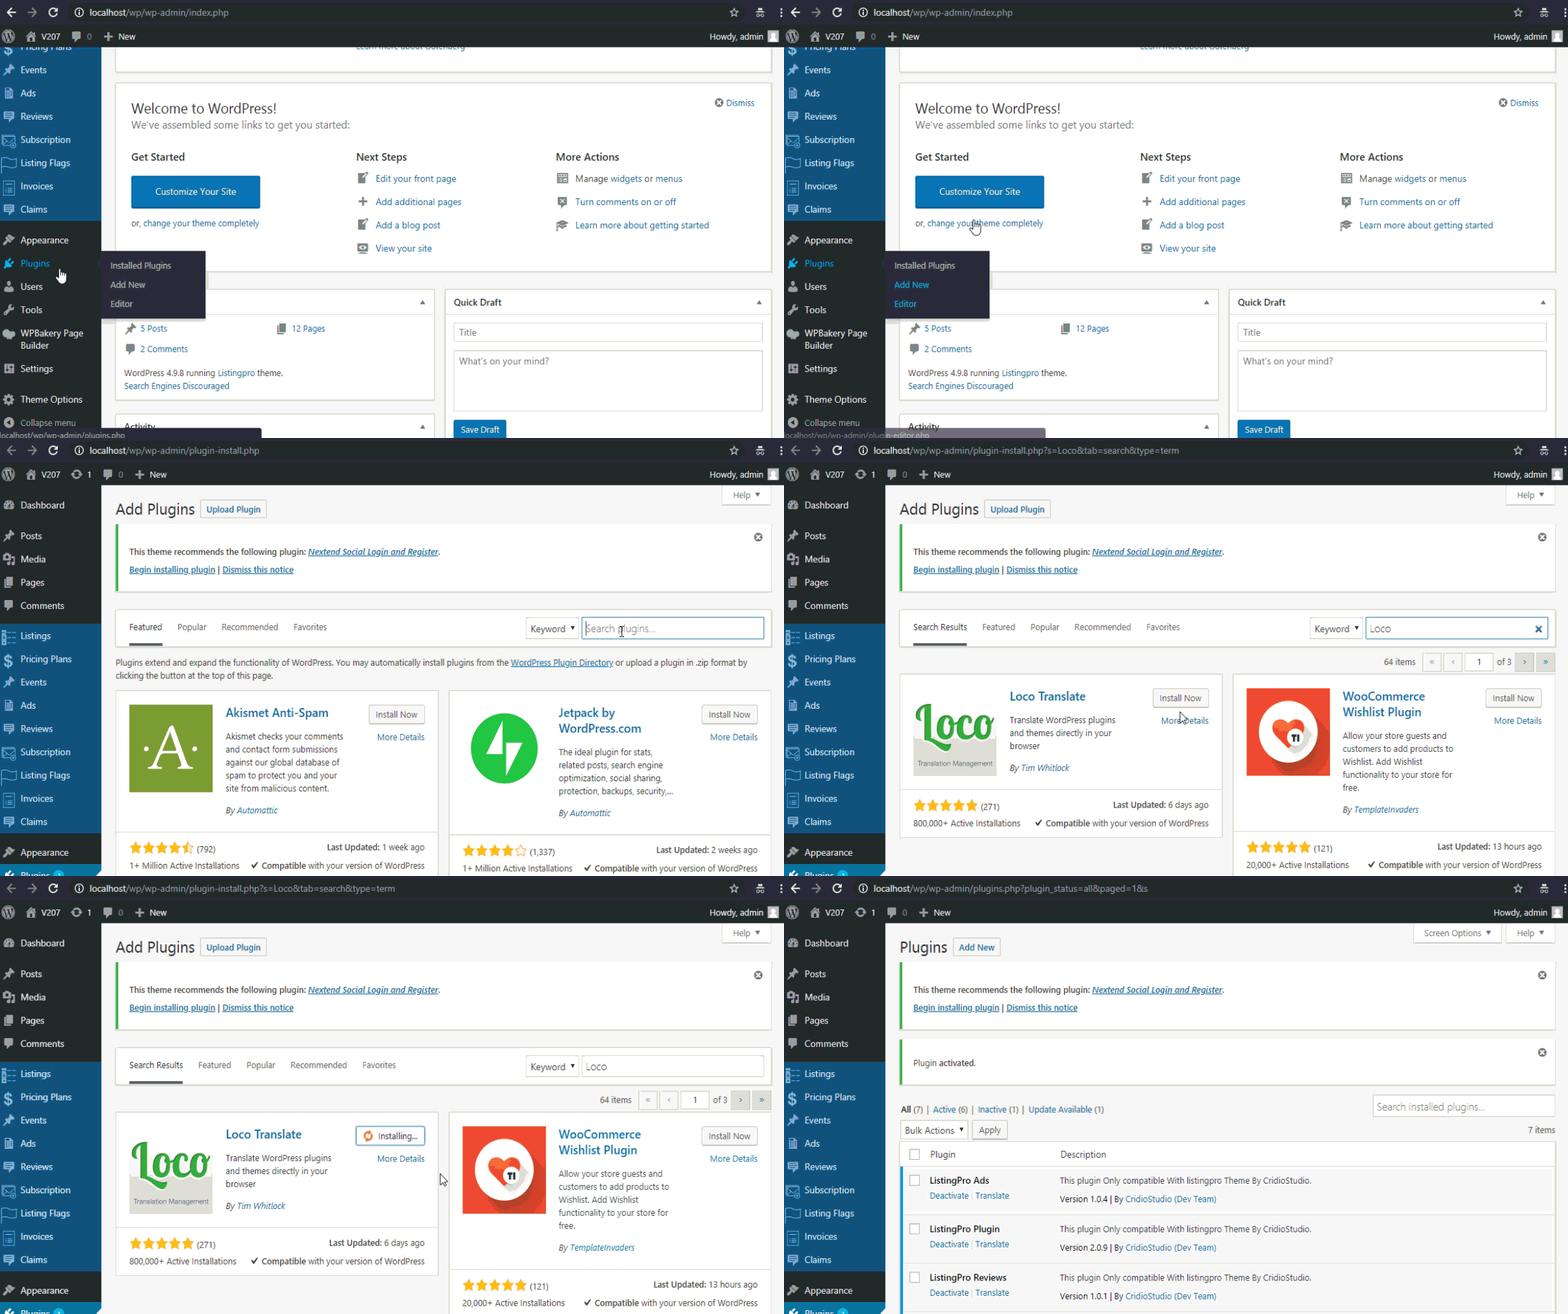
STEP 2: Go to Plugins > Add New
STEP 3: Search for Loco Translate, and click Install Now.
To fully translate including submit listing page, labels, placeholders, weekdays etc, you must translate ListingPro Themeand ListingPro Plugin. Some other words you’ll find them into Visual Composer Elements or in the Theme Options on your WordPress Dashboard, these words are those that are not related to theme or plugin structure.
PART 2: TRANSLATE THEME
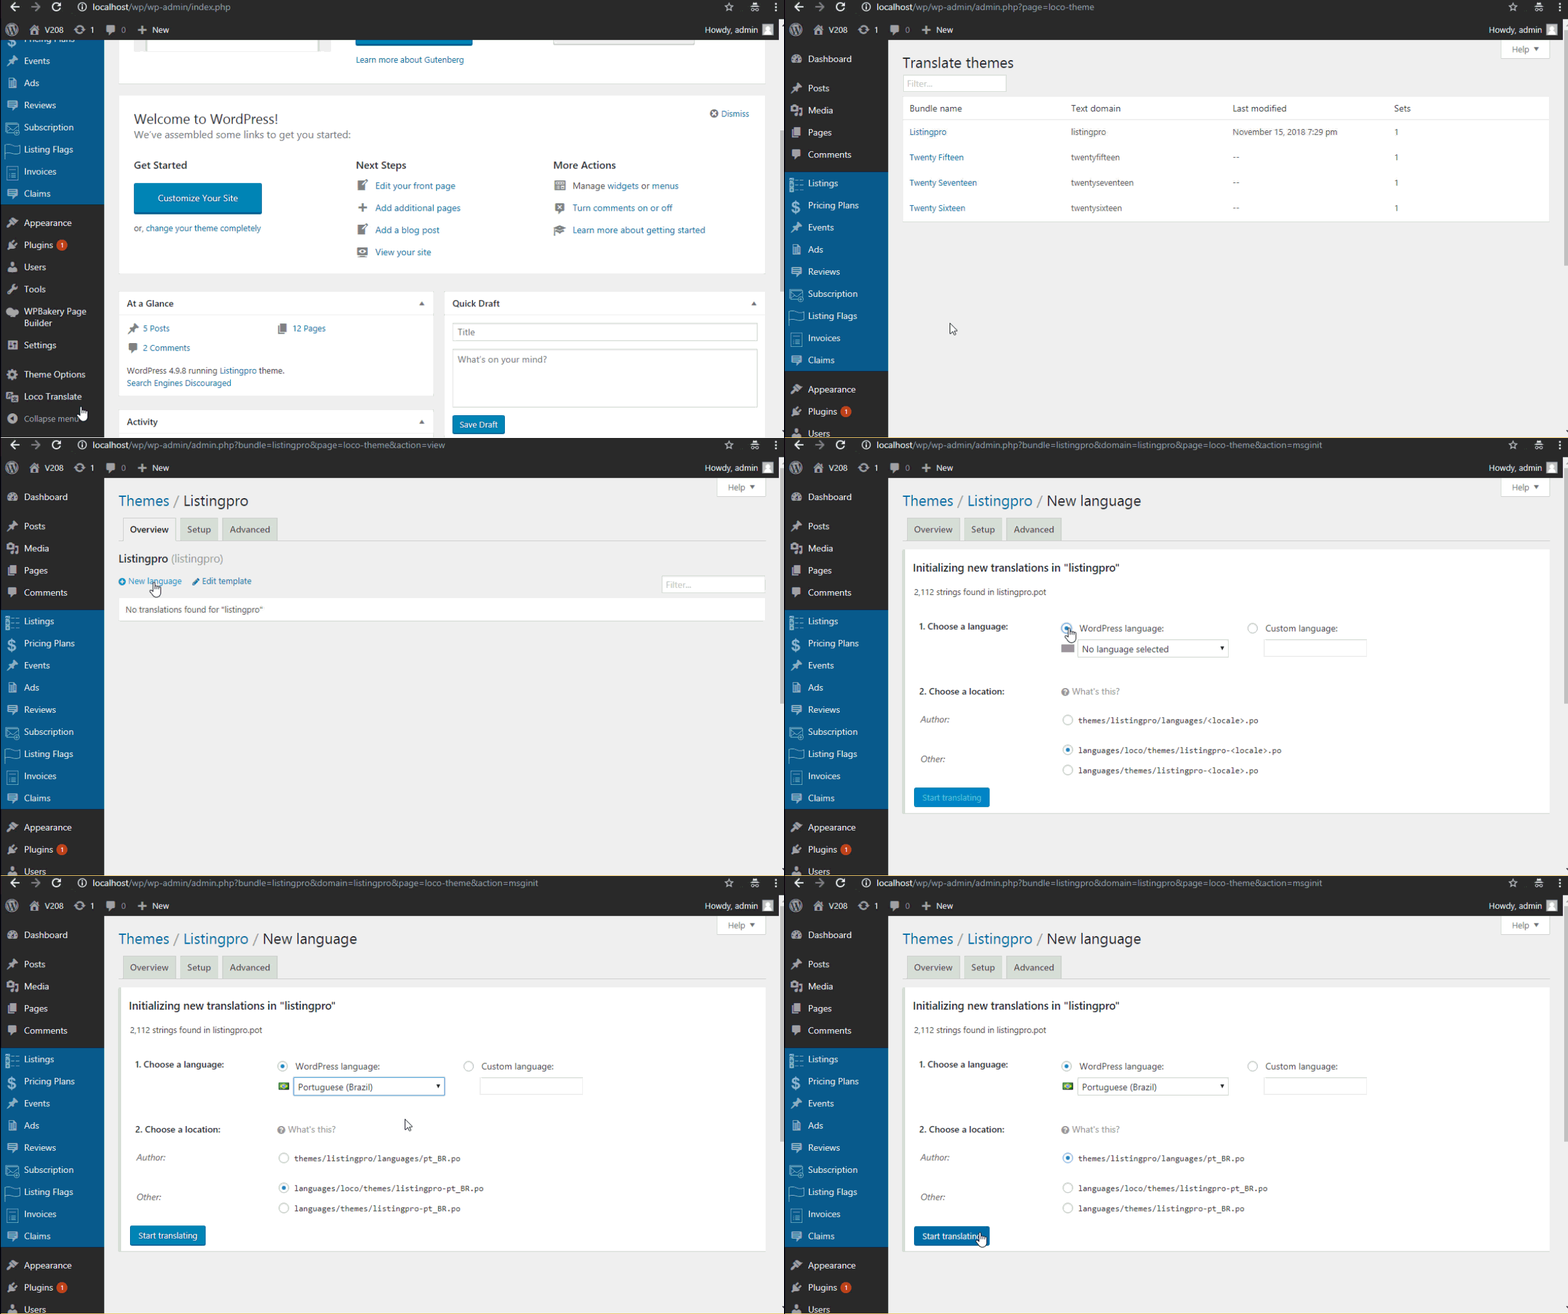
STEP 1: Go to Loco Translate > Themes
STEP 2: Under the Bundle name, select ListingPro
Make sure you select ListingPro and DO NOT SELECT ListingPro Child
STEP 3: Click on New language
Please you must never Edit Template as it will edit the core file.
STEP 4: Under Choose a language, select a new WordPress language from the drop-down (Example: Portuguese).
The selected language will be the new primary language for your site where the content will be translated from English.
STEP 5: UnderChoose a locationleave default (Author) settings selected, and click Start translating
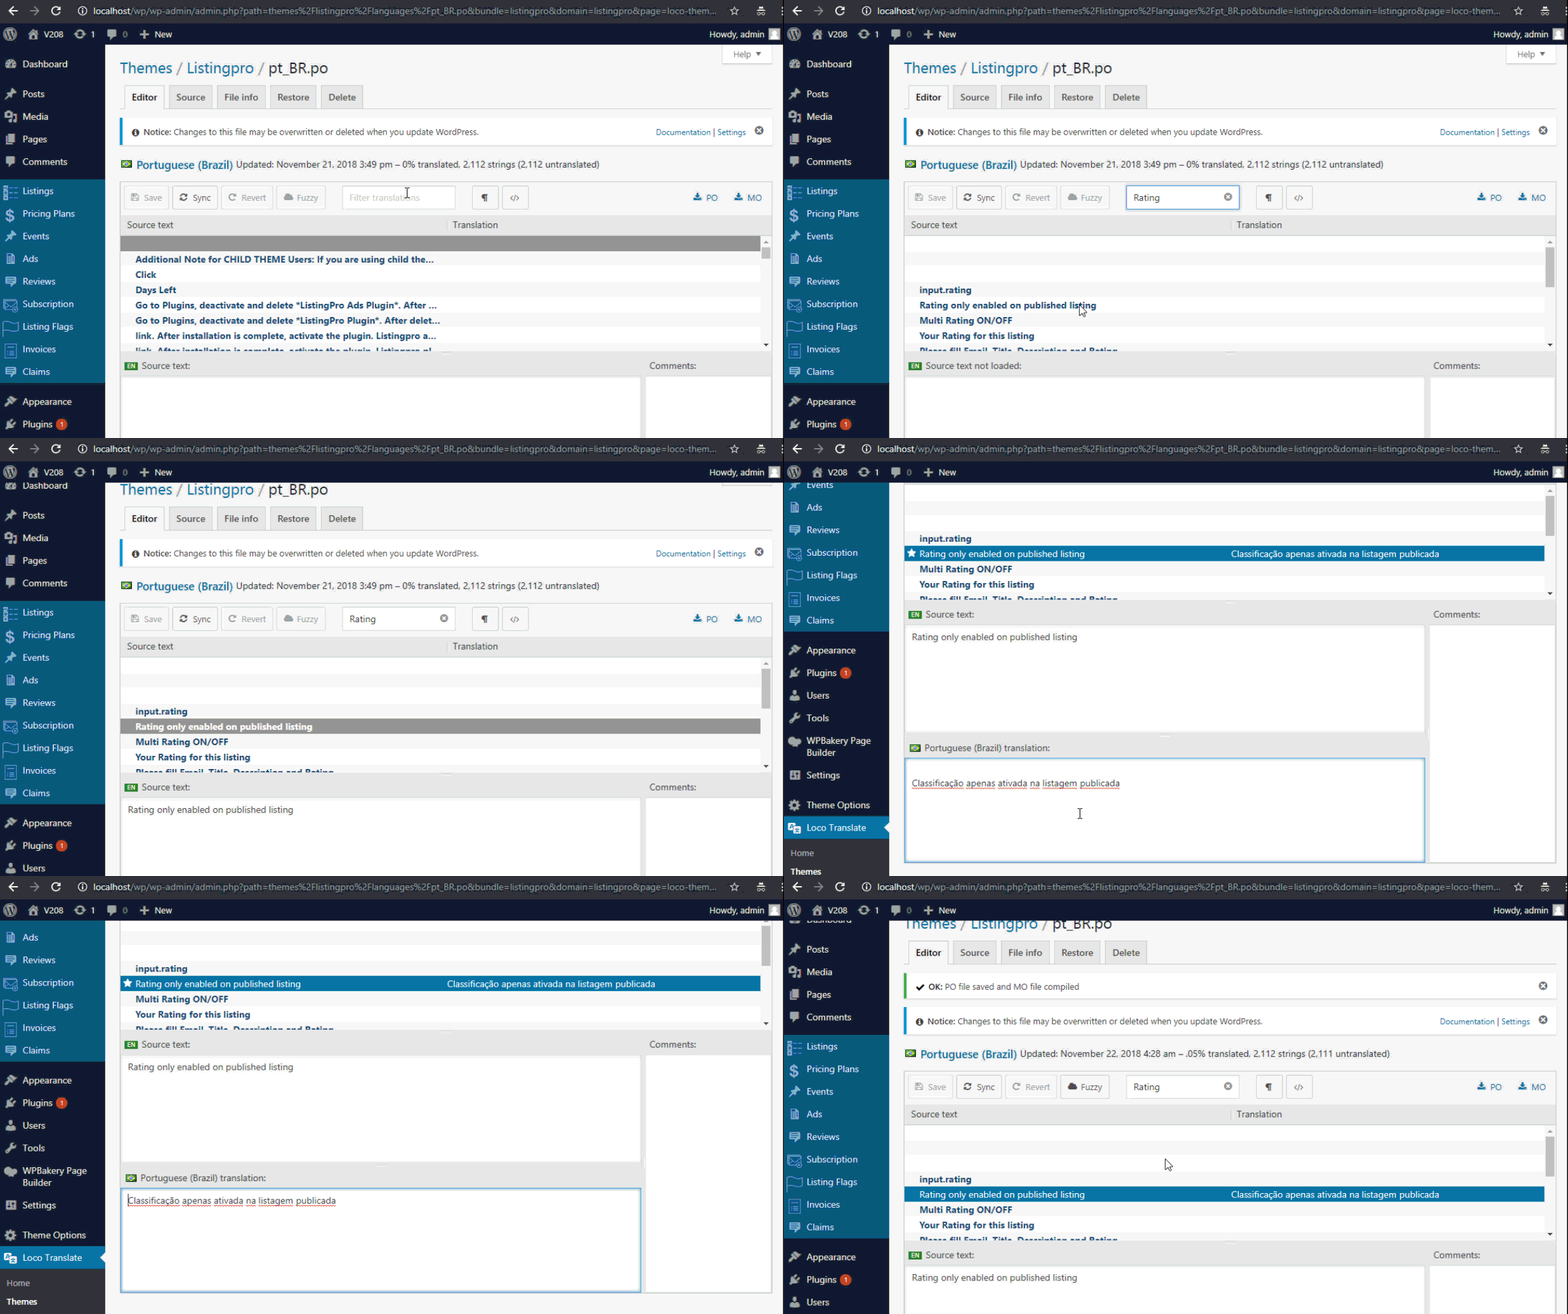
Under the Editor tab, next to the language name you can see how much percentage of translation completed and how many total strings are pending.
STEP 6: Select a Source textstring to be translated (Example: Rating only enable on published listing).
For quick search use Filter translations field. If you can’t find a string for translation leave a comment below.
STEP 7: Type (or paste) the translation (Example: Portuguese) of the selected Source text (English).
STEP 8: Click Save
PART 3: TRANSLATE PLUGIN
While customizing listing submission page, if you need to edit text for placeholders and info tips please watch the following video.
STEP 1: Go to Loco Translate > Plugins
STEP 2: Under the Bundle name, select ListingPro Plugin
STEP 3: Click on New language
STEP 4: Under Choose a language, select a new WordPress languagefrom the drop-down (Example: Portuguese).
The selected language will be the new primary language for your site where the content will be translated from English.
STEP 5: Under Choose a location leave default (Author) settings selected, and click Start translating
Under the Editor tab, next to the language name you can see how much percentage of translation completed and how many total strings are pending.
STEP 6: Select aSource text string to be translated.
For quick search use Filter translations field. If you can’t find a string for translation leave a comment below.
STEP 7: Type (or paste) the translation (Example: Portuguese) of the selected Source text (English).