Now change the typography as per your need. You will have various options for Body Font and HeadingStyles, such as Font Family, Weight, Style, Size, Height, and Color.
Nextend Connect Plugin, you can create an easy and customizable way to interact with your users while signing up an account on your Website.
Each Social Media Application will be divided into 3 different plugins which allow you to insert APIs Keys, Secret Keys and IDs referring to the Social Media defined for users registration.
To find The Next Connect, go to your WordPress Dashboard > Settings and you’ll notice 3 separated sections to configure the Social Login Buttons.
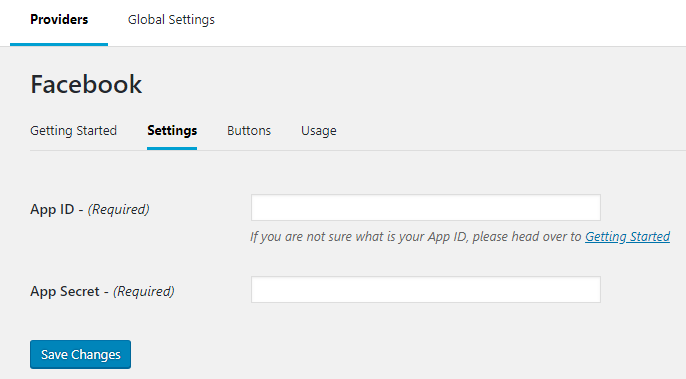
Nextend FB Connect
To configure and insert your Facebook App ID and App Secret, Click Here.
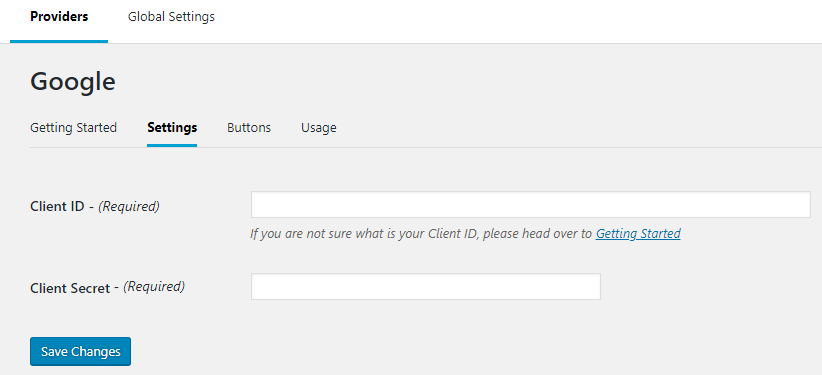
Nextend Google Connect
To configure and insert your Google Client ID and Client Secret, and API KeyClick Here.
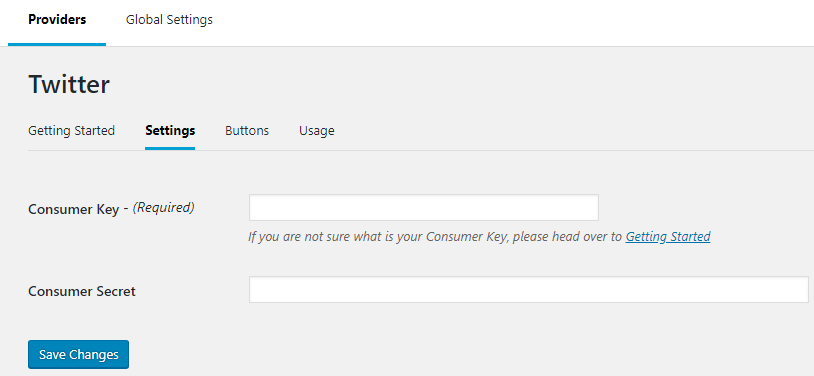
Nextend Twitter Connect
To configure and insert your Twitter Consumer Key and Twitter Consumer SecretClick Here.
YOU MUST BACKUP BEFORE UPDATING. WE ARE NOT RESPONSIBLE FOR ANY LOSS.
Generally before making any major changes or updating your WordPress, Theme or Plugins it’s very important that you must backup all your necessary files by taking a full backup (See below, PART 4).
Once you have a fullback, you are also responsible to make sure that every time there is a new release of the theme or plugin, all your customizations (See below, PART 1) or translations (See below, PART 2 & 3) are not affected by the update. In order for you to make this process smooth please make sure you have completed the steps mentioned in PART 1, 2 & 3 if they apply in your case.
PART 1: MOVE CUSTOMIZATION TO CHILD THEME
If any customizations have been made to the parent theme files, it will be overwritten after the update. So we highly recommend that you must install the child theme and move all your customization to the child theme.
STEP 2: Locate ALL the custom code changes made (either by you, your developer or even by our custom-services team upon your request).
If you are unable to locate the files in which the changes were made, please contact the person responsible for the changes. If it was our custom-services team who was responsible and there is a ticket regarding this, please update the ticket requesting the details.
STEP 3: Move all custom code changes to the child theme.
When you move a file that includes custom changes (example header.php), the file name and the path in the child theme should match with the parent theme. (Watch Video)
PART 2: MOVE THEME TRANSLATION TO CHILD THEME
For a step-by-step instruction on how to move Translation to the Child Theme, go here.
PART 3: BACKUP PLUGIN TRANSLATION FILES
STEP 1: Go to /wp-content/plugins/listingpro-plugin/languages
STEP 2: Download and save .po and .mo
The .po file name will be different based on the language, example for spanish it will be listingpro-plugin-es_ES.po.
After updating the theme make sure to restore the .po and .mo file in the same location and go to WP Admin > Loco Translate > Plugins > ListingPro Plugin, select the language translation file and click Sync and then Save
PART 4: BACKUP FULL THEME & PLUGIN
We highly encourage you to take a full backup of your WordPress Installation including files and database using any popular WordPress Backup Plugins. (Watch Video)
Backup via cPanel (Recommended)
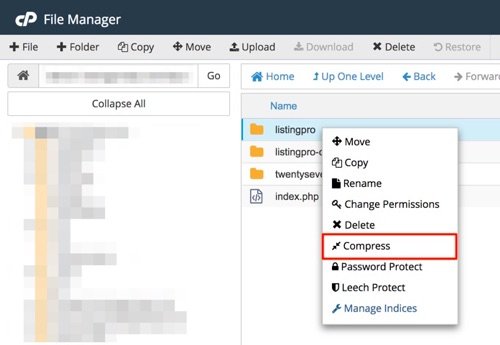
STEP 1: Log into cPanel > File Manager.
STEP 2: Go to wp-content/themes/
STEP 3: Right-click listingpro, and then click Compress
STEP 4: Next, right-click listingpro-child (if applied in your case), and then click Compress
STEP 5: Finally, go to wp-content/plugins/
STEP 6: Right-click listingpro-plugin, and then click Compress
Make sure to download all the backup files locally that you compressed aboved (listingpro.zip, listingpro-child.zip, and listingpro plugin.zip).
Now you can proceed with the update.
PART 5: SELECT HOW YOU LIKE TO UPDATE
There are primarily two ways to update our WordPress themes to the latest version, choose one option.
PLEASE READ THIS CAREFULLY! We have several customers who have successfully migrated from other themes. But we cannot give any guarantee that you will be able to migrate 100% of your listing data to from another theme to ListingPro as every theme structure is different. Simply by deleting your old theme and installing ListingPro will not automatically work with your old listings. You will have to export and import it using WP ALL IMPORT (Free Version – ListingPro Add-on included). In case of any doubt, access the WP ALL IMPORT Documentation. If you’re still facing some difficulties, go to our Support Channel and request our team for help and they will try their best to help you out if they can. Helping you with the migration is not something covered under the license you purchased so any help provided will be out of courtesy.
ListingPro is compatible with WP ALL IMPORT. First, you need to export all your listings as CSV or XML and import it with WP ALL IMPORT. Steps to import are provided here.
You can also go to the WP ALL IMPORT and see if your current theme is included in their add-ons page.