Why do I need to verify a claim by myself?

New listing submission (Free or Paid) does not mean listing owner verification, only the admin can verify and grant access after a claim request is submitted.

Admins can certify if the claimed business has come from the true owner by verifying the details sent when claiming a specific listing. Unfortunately, due to the differences between countries and its laws, it’s important that the admin can include details on their FAQ and how to proceed and verify the ownership for a listing.

By this way, there are fewer chances for mistakes while verifying manually a listing.

By this mean, we can certify and give both users (admin owner, customer-owner and final users) a better security that each claiming listing is being authenticated by (admins, managers etc).

But don’t worry, if your business idea doesn’t fit the way which was explained above, you can disable it as per needed.


Missing stylesheet error when installing the theme

A very common issue that occurs with users new to installing WordPress themes is a “Broken theme and/or stylesheets missing” error message being displayed when trying to upload or activate the theme. This error message does not mean that the ListingPro theme you have purchased is broken, it simply means it has been uploaded incorrectly

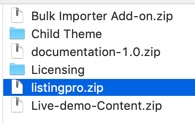
If you have downloaded all the files, you have to unzip it and select the correct file (ex. listingpro.zip).

Please make sure you are uploading only the installable theme which is called listingpro.zip. If you upload ALL other files you will receive an error.

Upload the Installable WordPress file admin area

  • Log in to your WordPress admin area.
  • Browse to Appearance > Themes
  • Click on ‘Add New’.
  • Click ‘Upload’.
  • Browse and select the theme zip file to ‘Upload’.

Upload Via FTP

  • WordPress files can also be uploaded manually via FTP.
  • Upload the files to /wp-content/themes/ folder on your server.
  • Login to your WordPress admin area to change the theme.

For more information, you can also refer to the following article.

How to optimize to improve my site speed?

ATTENTION! PLEASE BACKUP BEFORE OPTIMIZING YOUR SITE. WE ARE NOT RESPONSIBLE FOR ANY DAMAGE TO YOUR SITE.


What Plugins are recommended for Optimization?

  • PhastPress
  • ListingPro Minifier
  • WP Rocket
  • Short Pixel (images)
  • Perfmatters


How to Optimize ListingPro? 

This optimization video is created by SERT MEDIA and is not an official Cridio Studio video.

How much does our WordPress theme affect page speed?

Here are some tips to speed up your ListingPro site:

Shared hosting v/s Dedicated hosting

Need fast & secure hosting for ListingPro? Try Cloudways 

If you are planning to use ListingPro for the biggest directory and for handling a large number of listings then you should choose a dedicated server instead of a shared hosting package. It will increase your server’s speed automatically by processing faster results than shared hosting.

Because if you are using shared hosting your server resources will be shared with other websites which are relying on the same server. On the other hand, if you are using a dedicated server then your server resources will be available for your website and it will reduce server response time.

Remove Unnecessary plugins

Visit your plugins page from the back end and remove all unnecessary and not used plugins from there.

Optimize Database Tables

It’s very important and necessary to optimize your site’s database on a regular basis in order to speed up your site. For example, you can remove all unnecessary junk files such as spam comments, post revisions etc. which are not needed or expired.

Optimize images

Crop and resize all uploaded images based on your site’s configuration and optimize images for faster loading.

Use CDN: The meaning of CDN is a content delivery network. Most of the popular sites nowadays are using CDN such as MaxCDN to deliver content from their site.

Reduce Redirects:
Please don’t use any redirects if not required. Redirects may cause slow page loading.

Memory Limit: Sometimes increasing the memory limit variable of the php.ini file also helps in loading your site faster.

Add Expires Caching Rules:
Add expires caching by inserting the codes inside of the .htaccess file.

## EXPIRES CACHING ##
<IfModule mod_expires.c>
ExpiresActive On
ExpiresByType image/jpg “access plus 1 year”
ExpiresByType image/jpeg “access plus 1 year”
ExpiresByType image/gif “access plus 1 year”
ExpiresByType image/png “access plus 1 year”
ExpiresByType text/css “access plus 1 month”
ExpiresByType application/pdf “access plus 1 month”
ExpiresByType text/x-javascript “access plus 1 month”
ExpiresByType application/x-shockwave-flash “access plus 1 month”
ExpiresByType image/x-icon “access plus 1 year”
ExpiresDefault “access plus 2 days”
</IfModule>
## EXPIRES CACHING ##

All of the above tips are really very easy to implement to your site. And if you regularly follow then your site will be faster than other sites and you will see better performance.


What are the recommended image sizes for ListingPro?

Some users may face issues while uploading image files to be shown on homepage and categories.

These errors may occur by the way you’ve saved the image file.

Go to your Media Library and check if the image size corresponds exactly as defined.

1 – Home Banner Image

The recommended image size for Home Banner Image is: 1600×1200

You can crop and scale the image the way you desire to, in case you need to give focus in some area of your image.

After uploading your image file, check if the image size corresponds the width and height as mentioned above.

ATTENTION

The Banner Height was set as 610 by default. If you really know what you’re doing, you can change it the way you want to. We recommend that you leave this option set as default by 610. This way, you won’t suffer any malfunction at the responsiveness on mobile devices..

2 – Page header background image

The recommended image size for Page header background image is: 1500×300

You can still use the 1600×1200 though, and after uploading the image, you should go to your Media Library and edit your image size, cropping it, centralizing the detail that you want your image to appear, and set the Height as 300. Don’t worry if your image has the Width result as 1400, the important factor is the Height size of 300.

ATTENTION

Width size less than 1300, will result in gaps between margins, left and right.

3 – Location Images

In case you want to add images for specific locations and show them on your homepage, the recommended size for Location Images is 800×600.

ATTENTION

Higher pixels or Lowest ones, will make the image lose focus and will blur the image causing its distortions.

4 – Logo Images and Logo on header

The recommended size for logo icon is: 32×32, 64×64, 128×128

The recommended size for logo images on header is: 268×38

ATTENTION

Logo sizes will differ depending on whether your logo has also texts. Some users may prefer to include only the logo itself without texts in it. You’ll most likely to test it and check which one will fit better for your purpose.


 

How to change currency symbol?

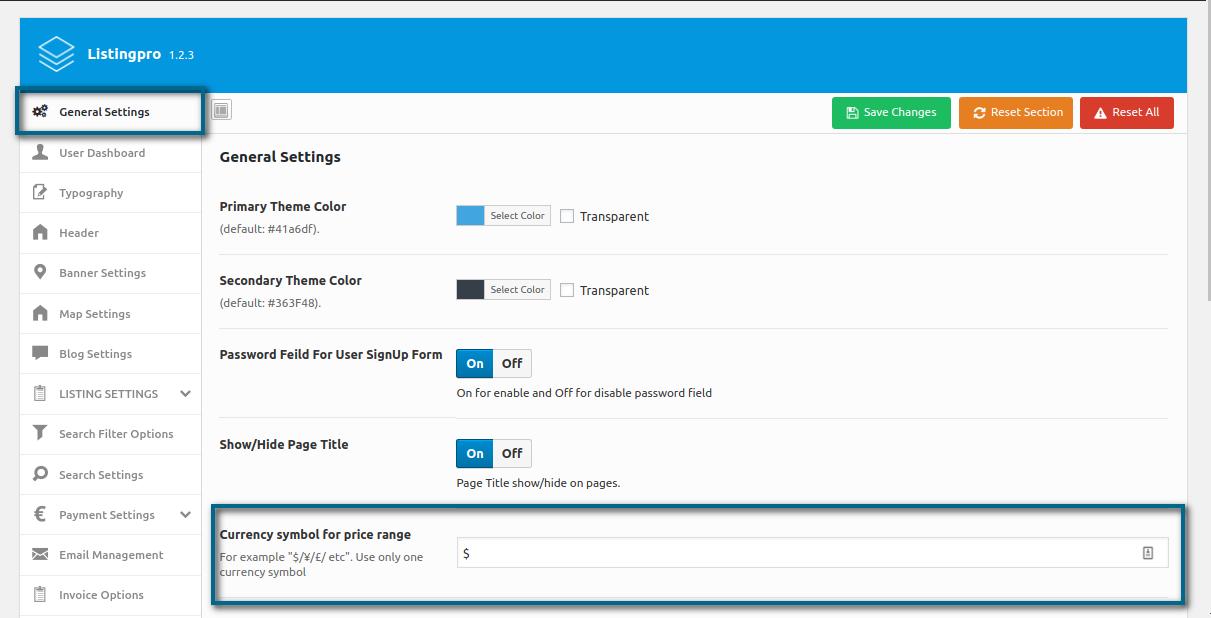
STEP 1: Go to the WordPress dashboard.

STEP 2: Navigate to Theme Options > General Setting.

STEP 3: Under the Currency symbol for the price range, change the symbol as desired.


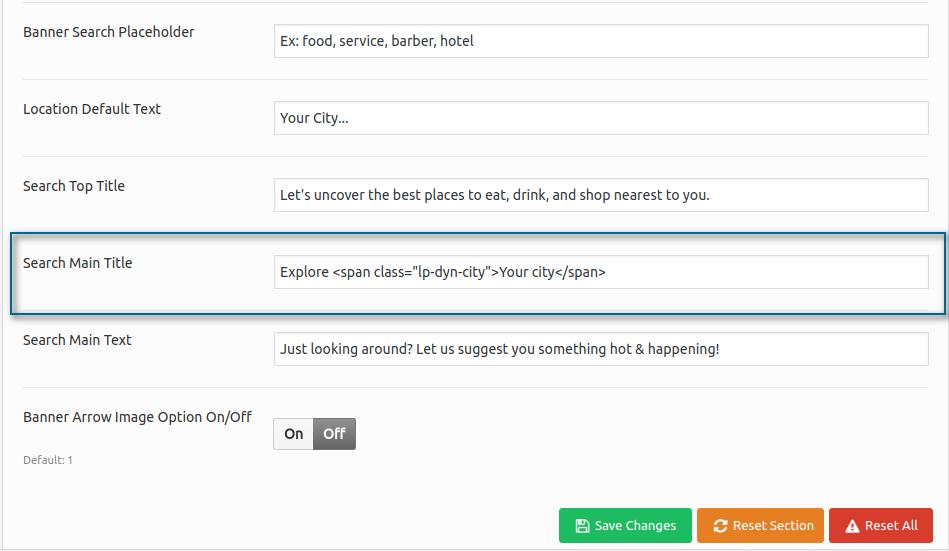
How to change the search box main title?

If you still want to get dynamic access to IP ADDRESS but want to customize the box main title, kindly follow the following steps:


STEP 1: Login to WordPress admin dashboard.

STEP 2: Go to Theme Options > Banner Settings

See Screenshot below

STEP 3: Add a new title in the respective field

See Screenshot below

STEP 4: save changes

[custom-related-posts title=”Related Posts” order_by=”title” order=”ASC” none_text=”None found”]