Learn About All The ListingPro Forms

ListingPro includes various different forms.

  1. Front-end Listing Submission (FES) Form
  2. Listing Lead Form
  3. Directory Contact Form

1. Front-end Listing Submission (FES) Form

An easy drag-&-drop Front-End Submission (FES) form builder gives full control over how you want to build your entire front-end listing form for any industry.


2. Listing Lead Form

With the new Lead Form Builder, you can build a custom lead form that is global (applies to all listings) as per your requirement. Even the listing owners can build their specific custom lead forms.

Lead Form Builder in Action

Lead forms are connected to Inbox. ListingPro has a built-in INBOX feature for the business listing owners to communicate with their customers. (Also known as Private Member Chat, Private Messages, Instant Messaging or Internal Messaging System.)

Our advanced INBOX feature allows business owners to receive and reply to messages directly within the user-dashboard when a lead is generated via a lead form on the listing details page.

Watch This Video: Inbox: Internal Messaging System

The new Lead Form Builder allows to build a custom lead form that is global (applies to all listings) as per your requirement. Even the listing owners can build their specific custom lead forms.

3. Directory Contact Form

We offer a built-in contact form for example https://classic.listingprowp.com/contact-us

We also have integration with WP-Forms. For more info go here.

How to Setup Mollie

Mollie is a premium payment gateway developed for ListingPro. To purchase go here.

How to Setup Mollie

Part 1 – Downloading File

Follow the steps below once you have already purchased Mollie from ListingProWP.com/plugins

STEP 1: On ListingProWP official website, go to My Account

STEP 2: Under My Account select the View Details and Downloads.

STEP 3: On the Purchase Confirmation page, scroll down towards the end.

STEP 4: Under Products click the file name to start downloading the plugin file.

Part 2 – Installing File

STEP 1:  First unzip the download file, for example: unzipme-payfast-xx.zip

STEP 2:  Go to WordPress admin > Plugins

STEP 3: Click Add New, and then select Upload Plugin

STEP 4: Click Choose File and select the file from the local machine.

STEP 5: Click Install Now and then Activate Plugin


Part 3 – License Activation

If the license is not activated, the payment gateway will not work.

STEP 1: When a notification bar shows on the top, click Activate 

A prompt to enter the purchase key will appear.

STEP 2:  Go to the Purchase Confirmation page as explained above in Part-1 Step 3.

STEP 3:  Copy the license key.

STEP 4: Paste the license key.

STEP 5: Click Activate

If the activation is successful the red notification should now disappear.

Part 4 – Configuring Payment

GENERAL SETTINGS

STEP 1: Go to Theme Options > Payments > General

STEP 2: Enable Paid Submission by selecting YES

STEP 3: Under Currency for Paid Submission select your currency: EUR (All others)


MOLLIE SETTINGS

Before proceeding signup for Mollie Account, go here

STEP 1: Go to Theme Options > Payments > Mollie

STEP 2: Enable Mollie by selecting Enabled

STEP 3: Under API TYPE select Live or Sandbox

STEP 4: Enter Mollie Live API Key

We high-recommended to first obtain and test with Sandbox. The Test API key is different from Live API Key).


Part 5 – Testing

Make sure you already have paid pricing plans. read more 

STEP 1: From the front-end click Add Listing

STEP 2: Select a paid pricing plan.

STEP 3: Fill in the listing submission form.

STEP 4: Click Save & Preview

STEP 5: Click Pay & Publish

STEP 5: Click Pay & Publish

STEP 6: Select the listing and the Mollie and click Proceed to Next

STEP 7:  Review the payment summary and click Proceed to Next again

STEP 8:  It will redirect you to a secure Mollie checkout page, select VISA or another option

STEP 9:  Enter the payment details and click pay.

Once the payment is successful it should redirect you back to the thank you page on your website.


Frequently Ask Questions

What currencies are supported by Mollie?

EUR, BGN, HRK, CZK, DKK, GIP, HUF, ISK, GBP, CHF, NOK, PLN, RON,SEK

Does Mollie support a recurring (subscription) feature?

Yes, recurring is support except for PayPal via Mollie and SEPA Bank Transfer.

Listing Users Not Getting Email Notifications

Install the plugin Easy WP SMTP or WP Mail SMTP and configure it with the correct SMTP settings and test.

If you are still having issues contact your hosting provider to verify SMTP is enabled and there are no issues on the server end.

How to setup eWAY?

eWAY is a premium payment gateway developed for ListingPro. To purchase go here.

How to Setup eWAY

Part 1 – Downloading File

Follow the steps below once you have already purchased eWAY from ListingProWP.com/plugins

STEP 1: On ListingProWP official website, go to My Account

STEP 2: Under My Account select the View Details and Downloads.

STEP 3: On the Purchase Confirmation page, scroll down towards the end.

STEP 4: Under Products click the file name to start downloading the plugin file.

Part 2 – Installing File

STEP 1:  First unzip the download file, for example: unzipme-payfast-xx.zip

STEP 2:  Go to WordPress admin > Plugins

STEP 3: Click Add New, and then select Upload Plugin

STEP 4: Click Choose File and select the file from the local machine.

STEP 5: Click Install Now and then Activate Plugin


Part 3 – License Activation

If the license is not activated, the payment gateway will not work.

STEP 1: When a notification bar shows on the top, click Activate 

A prompt to enter the purchase key will appear.

STEP 2:  Go to the Purchase Confirmation page as explained above in Part-1 Step 3.

STEP 3:  Copy the license key.

STEP 4: Paste the license key.

STEP 5: Click Activate

If the activation is successful the red notification should now disappear.

Part 4 – Configuring Payment

GENERAL SETTINGS

STEP 1: Go to Theme Options > Payments > General

STEP 2: Enable Paid Submission by selecting YES

STEP 3: Under Currency for Paid Submission select your currency: ZAR (Only currency supported by eWAY)


EWAY SETTINGS

Before proceeding signup for eWAY Account, go here

STEP 1: Go to Theme Options > Payments > eWAY

STEP 2: Enable eWAY by selecting Enabled

STEP 3: Under API TYPE select Live or Sandbox

STEP 4: Enter eWAY Customer API Key

STEP 5: Enter eWAY Customer Password

We high-recommended to first obtain and test with Sandbox. The API key is different for each mode (Sandbox/Live).


Part 5 – Testing

Make sure you already have paid pricing plans. read more 

STEP 1: From the front-end click Add Listing

STEP 2: Select a paid pricing plan.

STEP 3: Fill in the listing submission form.

STEP 4: Click Save & Preview

STEP 5: Click Pay & Publish

STEP 5: Click Pay & Publish

STEP 6: Select the listing and the eWAY and click Proceed to Next

STEP 7:  Review the payment summary and click Proceed to Next again

STEP 8:  It will redirect you to a secure eWAY checkout page, select VISA or another option

STEP 9:  Enter the payment details and click pay.

Once the payment is successful it should redirect you back to the thank you page on your website.


Frequently Ask Questions

What currencies are supported by eWAY?

AUD, NZD, SGD, HKD, MOP

Does eWAY support a recurring (subscription) feature?

No

How to setup PayU India?

PayU India is a premium payment gateway developed for ListingPro. To purchase go here.

How to Setup PayU

Part 1 – Downloading File

Follow the steps below once you have already purchased PayU from ListingProWP.com/plugins

STEP 1: On ListingProWP official website, go to My Account

STEP 2: Under My Account select the View Details and Downloads.

STEP 3: On the Purchase Confirmation page, scroll down towards the end.

STEP 4: Under Products click the file name to start downloading the plugin file.

Part 2 – Installing File

STEP 1:  First unzip the download file, for example: unzipme-payu-xx.zip

STEP 2:  Go to WordPress admin > Plugins

STEP 3: Click Add New, and then select Upload Plugin

STEP 4: Click Choose File and select the file from the local machine.

STEP 5: Click Install Now and then Activate Plugin


Part 3 – License Activation

STEP 1: When a notification bar shows on the top, click Activate 

A prompt to enter the purchase key will appear.

STEP 2:  Go to the Purchase Confirmation page as explained above in Part-1 Step 3.

STEP 3:  Copy the license key as shown below.
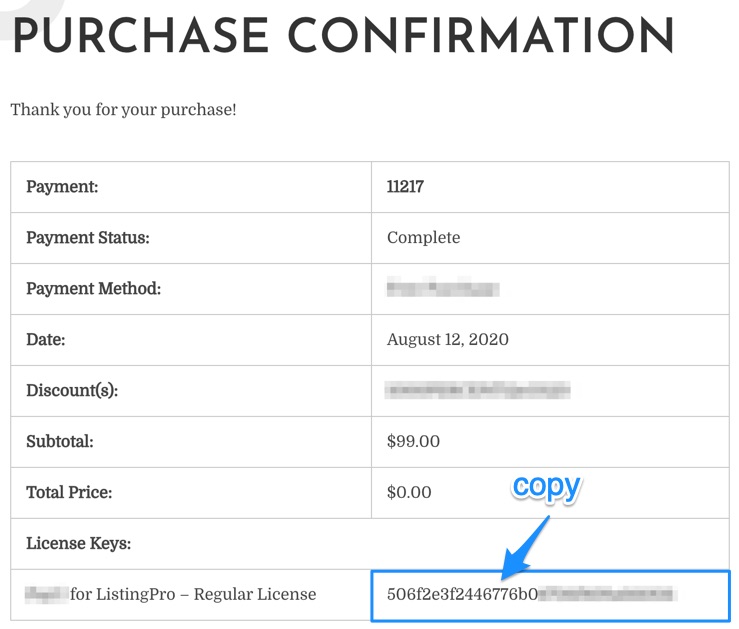
STEP 4: Paste the license key.

STEP 5: Click Activate

If the activation is successful the red notification box should now disappear.

Part 4 – Configuring Payment

GENERAL SETTINGS

STEP 1: Go to Theme Options > Payments > General

STEP 2: Enable Paid Submission by selecting YES

STEP 3: Under Currency for Paid Submission select your currency: INR Only currency supported by PayU


PayU SETTINGS

Before proceeding signup for PayU Account, go here

STEP 1: Go to Theme Options > Payments > PayU

STEP 2: Enable PayU by selecting Enabled

STEP 3: Under API TYPE select Live or Sandbox

STEP 4: Enter PayU Secret Key

STEP 5: Enter PayU Key ID

We high-recommended to first obtain and test with Sandbox. The API key is different for each mode (Sandbox/Live).


Part 5 – Testing

Make sure you already have paid pricing plans. read more 

STEP 1: From the front-end click Add Listing

STEP 2: Select a paid pricing plan.

STEP 3: Fill in the listing submission form.

STEP 4: Click Save & Preview

STEP 5: Click Pay & Publish

STEP 5: Click Pay & Publish

STEP 6: Select the listing and the PayU and click Proceed to Next

STEP 7:  Review the payment summary and click Proceed to Next again

STEP 8:  It will prompt you with PayU checkout, enter the Phone number, and click PROCEED

STEP 9:  Select a Card or other options and follow the instructions to complete the order.

Once the payment is successful it should redirect you back to the thank you page on your website.


Frequently Ask Questions

What currencies are supported by PayU?

PayU only works with INR.

How to setup Paystack?

Paystack is a premium payment gateway developed for ListingPro. To purchase go here.

How to Setup Paystack

Part 1 – Downloading File

Follow the steps below once you have already purchased Paystack from ListingProWP.com/plugins

STEP 1: On ListingProWP official website, go to My Account

STEP 2: Under My Account select the View Details and Downloads.

STEP 3: On the Purchase Confirmation page, scroll down towards the end.

STEP 4: Under Products click the file name to start downloading the plugin file.

Part 2 – Installing File

STEP 1:  First unzip the download file, example: unzipme-paystack-xx.zip

STEP 2:  Go to WordPress admin > Plugins

STEP 3: Click Add New, and then select Upload Plugin

STEP 4: Click Choose File and select the file from the local machine.

STEP 5: Click Install Now and then Activate Plugin


Part 3 – License Activation

STEP 1: When a notification bar shows on the top, click Activate 

A prompt to enter the purchase key will appear.

STEP 2:  Go to the Purchase Confirmation page as explained above in Part-1 Step 3.

STEP 3:  Copy the license key as shown below.

STEP 4: Paste the license key.

STEP 5: Click Activate

If the activation is successful the red notification box should now disappear.

Part 4 – Configuring Payment

GENERAL SETTINGS

STEP 1: Go to Theme Options > Payments > General

STEP 2: Enable Paid Submission by selecting YES

STEP 3: Under Currency for Paid Submission select your currencies.

Nigeria (NGN) or Ghana (GHC) are the only supported currencies by Paystack


PAYSTACK SETTINGS

Before proceeding signup for Paystack Account, go here

STEP 1: Go to Theme Options > Payments > Paystack

STEP 2: Enable Paystack by selecting Enabled

STEP 3: Under API TYPE select Live or Sandbox

STEP 4: Enter Paystack Secret Key

STEP 5: Enter Paystack Key ID

We high-recommended to first obtain and test with Sandbox. The API key is different for each mode (Sandbox/Live).


ENABLE RECURRING

Theme Options Settings

STEP 1: Go to Theme Options > Payments > General

STEP 2: Enable Recurring Payment by selecting YES

If you want this option to be enabled by default during checkout enable Auto Recurring Payment by selecting YES. The user will have the option to turn off the auto-recurring feature during checkout itself.

Pricing Plan Settings

STEP 1: Go to WordPress admin > Pricing Plans 

STEP 2: Add or Edit a Plan (Not Free)

STEP 3: Enable Paystack Recurring Payment and select a Duration

STEP 4: Click Publish or Update to save the settings


Part 5 – Testing

Make sure you already have paid pricing plans. read more 

STEP 1: From front-end click Add Listing

STEP 2: Select a paid pricing plan.

STEP 3: Fill in the listing submission form.

STEP 4: Click Save & Preview

STEP 5: Click Pay & Publish

STEP 5: Click Pay & Publish

STEP 6: Select the listing and the Paystack and click Proceed to Next
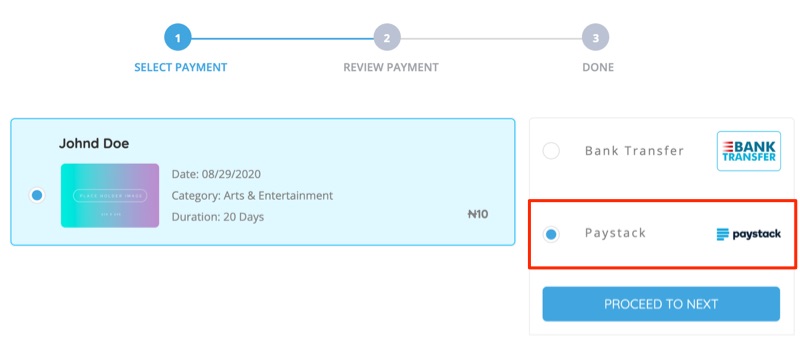
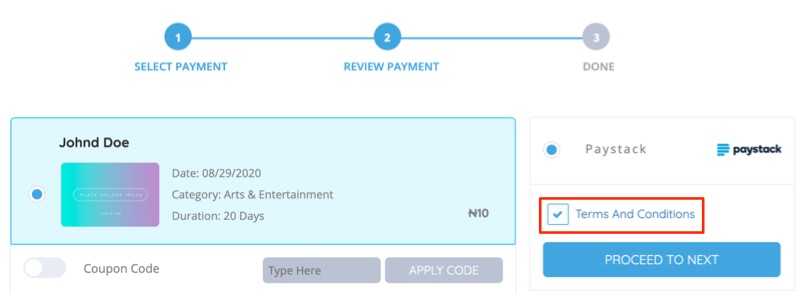
STEP 7:  Review the payment summary and check the Terms and Conditions box, and click Proceed to Next again
STEP 8:  It will prompt you with Paystack checkout, select an option.
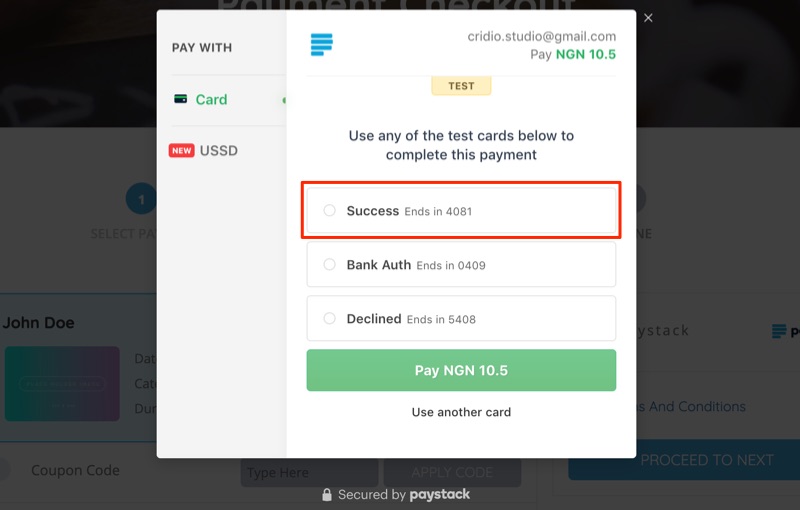
STEP 8:  Click the green Pay button and follow the instructions to complete the order.
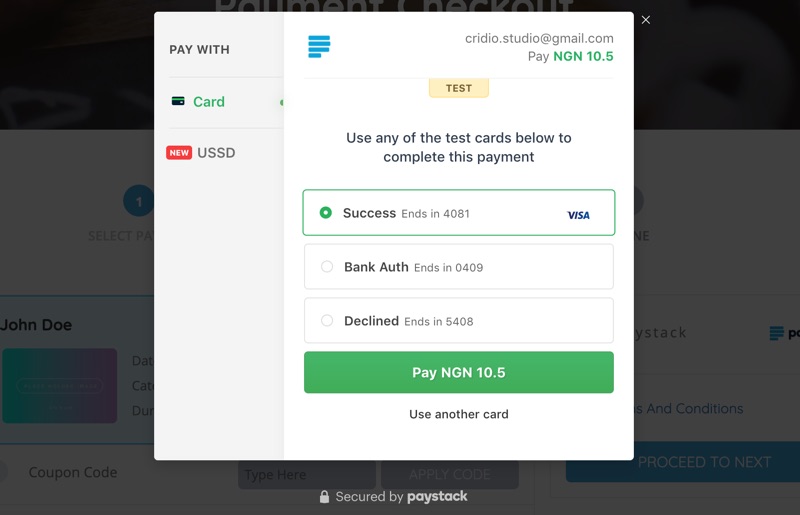
One the payment is successful it should redirect you back to the thank you page on your website.


Frequently Ask Questions

What currencies are supported by Paystack?

Paystack only works with Nigeria (NGN) or Ghana (GHC). For more info read this.