To generate the Stripe API Keys (Secret Key and Publishable Key) please follow the below steps:
STEP 1: Log in to your Stripe dashboard.
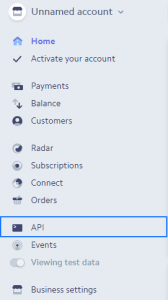
STEP 2:Go to API in the left menu.
STEP 3: Your secret and publishable keys should be on this page. Before using generated secret keys you will need to use the toggle switch that says “Viewing test data”. You have to set it to ”Viewing live data”.
STEP 4: Now click on Reveal live key token
Your account will have two sets of API keys – Live and Test. In order to get access to both of them, you will need to use the toggle switch in the left menu that says “View test data”. Clicking that switch will toggle between the live and test keys. Live keys will start with pk_ and sk_. The pk_ keys are the publishable keys. The sk_keys are the secret keys. Test keys will start with pk_test_ and sk_test_. The pk_ keys are the publishable keys. The sk_keys are the secret keys.
If you need advanced customization then you will need coding knowledge required or will have to request for customization service.
The customization is divided into two main areas.
General Pages (NON-Directory and Listing):
Pages such as Home and About Us are not related to directory and listing. To customize such pages you can do the following:
Use Elementor (Free) or Visual Composer (drag & drop page builder) to customize non-directory related pages.
You can even use any page builder like Elementor or beaver but the custom elements that are designed for Visual Composer will not be available.
We have 20+ custom Visual Composer elements designed for ListingPro. For more Read This.
Directory and Listing pages
Pages such as Search result page, Listing by Category Page, Listing by Location Page, Listing Details Page are related to directory and listing. To customize such pages you can do the following:
Use Theme Options Settings for changing branding, color, styling, typography, etc.
The following topics are covered in this knowledge base article.
Setup Business Hours for English Users
Setup Business Hours for Non-English Users
Enabling a Second Time-slot for Submit Listing
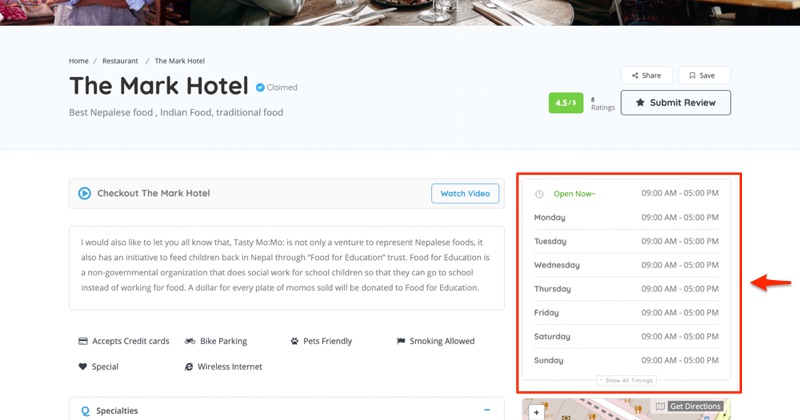
Business Hours Expanded with Open Now Indicator
In order to display Opened or Closed status correctly of all business listings, the below steps must be followed carefully.
Business hours are mainly for two different types of users.
English Users – Users whose default Site Language is English.
Non-English Users – Users whose default Site Language is not English.
1. Setup Business Hours for English Users
If your native language is English by default, there’s no need to edit the default WordPress language. Simply follow the below steps to configure your time zone.
STEP 1: Log in to the WordPress admin dashboard.
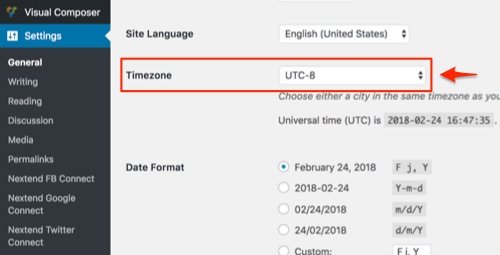
STEP 2: Go to Settings > General
STEP 3: Select the appropriate Timezone from the drop-down list.
.
STEP 4: Click Save Changes
Business hours can vary based on the timezone as well as the country. So it’s very important for ALL USERS (English and Non-English users) to configure relevant settings in order to display open and closed timings properly. Otherwise open and closed timings may work incorrectly.
2. Setup Business Hours for Non-English Users
For Non-English users, there are THREE parts.
PART-1: Set Local Site Language and Timezone
If your default WordPress language is NOT ENGLISH, you must set your local language and timezone. Follow the procedure below:
STEP 1: Log in to the WordPress admin dashboard.
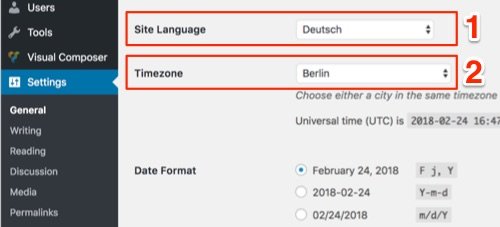
STEP 2: Go to Settings > General
STEP 3: Select your Site Language (Example: For German, it’s Deutsch).
STEP 4: Select your Timezone (Example: For Germany, it’s Berlin).
Choose either a city in the same timezone as you or a UTC timezone offset.
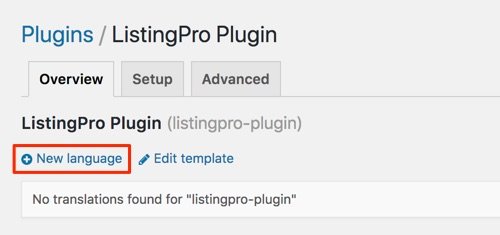
Make sure to select ListingPro Plugin in STEP 1, and NOT ListingPro Theme.
STEP 1: Go to Loco Translate > Plugins > ListingPro Plugin
STEP 2: Under Overview tab, select New language
.
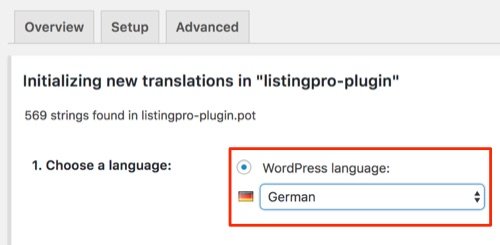
STEP 3: Choose your local language (Same as your Site Language under Settings > General in STEP 3 of PART-1 above).
.
STEP 4: Click Start translating
b. Translate strings (words) in new language
.
STEP 1: Find the strings related to the operational hours, weekdays (Example: Monday).
STEP 2: Select the string from the source text results.
STEP 3: Enter translation (Example: Montag)
STEP 4: Repeat steps 1-3 and translates all weekdays (Example in German: Tuesday = Dienstag, Wednesday = Mittwoch, and so on.)
STEP 5: Click Save, and then click Sync
When translating the Weekdays for ListingPro Plugin (Not ListingPro Theme) make sure to match the upper-case and lower-case as it’s case-sensitive. Always use full-forms such as Monday, Tuesday, Wednesday etc, and DO NOT USE short-forms such as Mon, Tues, Wed as it won’t work. Also, make sure when translating weekdays it must be matched with the official name of the weekday.
PART-3: Proper Testing
STEP 1: Add a NEW business listing.
STEP 2: Add all Weekdays and their appropriate timing (in a new language).
STEP 3: Save the listing.
STEP 4: Check the timing of the new listing.
If you want to test a previously created listing you must delete all the weekdays/timing and re-add all the weekdays along with appropriate timings and save.
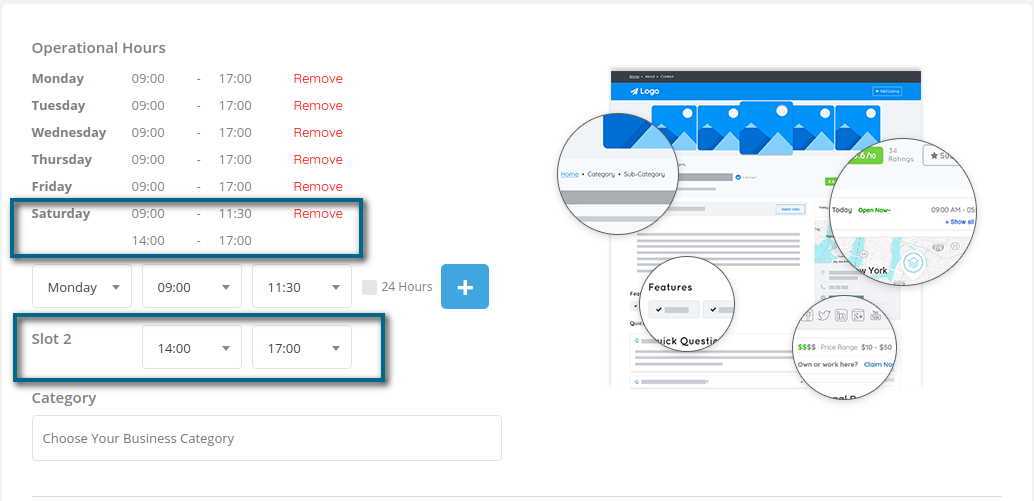
3. Enabling a Second Time-slot for Submit Listing
To include the 2-time slots into the Submit Listing, first, go to Theme Options > Listing Settings > Listing Submit & Edit
Enable the 2-time slots as shown in the image below
Click on Save Changes
In case if your business has a defined weekday that works for 24hours, just click on the box and hit on the + Button to set the working hour for the day as “Open 24hrs“.
It’s recommended to use the 24Hformat instead of the 12Hformat. Also, operational hours with your language translation, the weekdays should be translated correctly, without word contractions. Use the standard weekdays translation.
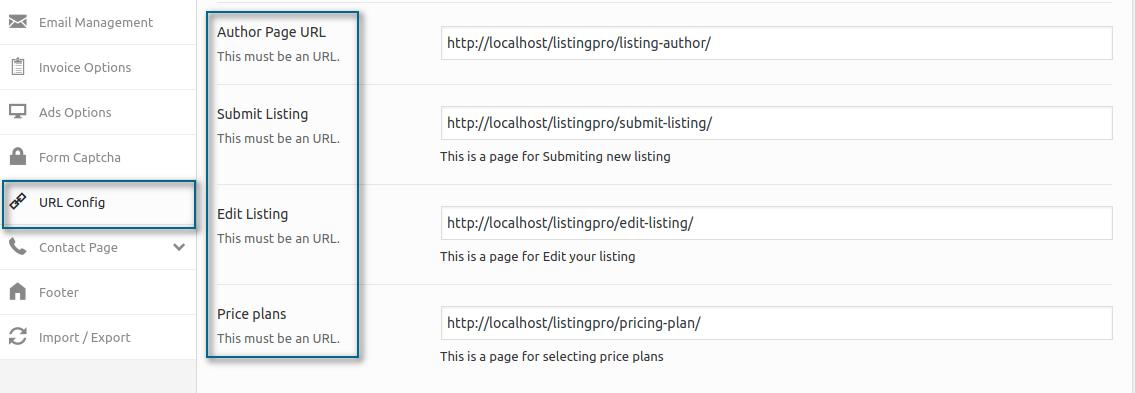
For new users who have recently installed ListingPro, there are some settings that need to take into consideration to avoid any 404 errors or blank images with shortcodes.
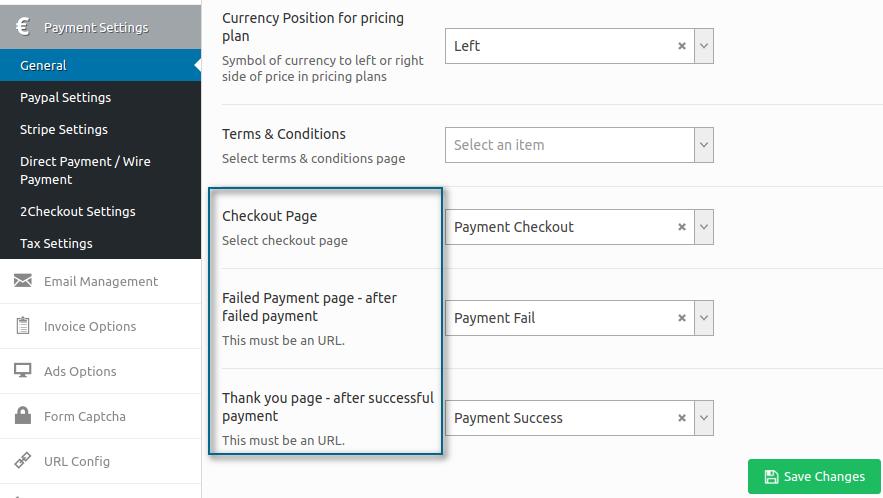
1 – Go to the Theme Options > URL Config and check the following details
Add the corresponded URLs in this settings, to avoid 404 errors while clicking on these pages, Author Dashboard, Submit Listing, Edit Listing, and Price Plans.
2 – While using the Price plans, make sure that the settings are also configured, Go to Theme Options > Payment Settings > General and check the following details
Including these pages from the drop-down, you won’t face any more issue with blank pages showing only a shortcode. Simply add the Payment Checkout, Payment Fail, and Payment Success into the correspondent section.
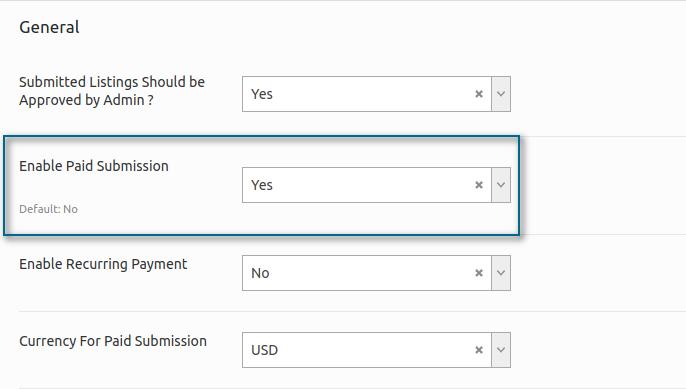
3 – If you’re facing issues on the homepage, more specifically at the +Add Listing button, simply go to the Theme Options > Payment Settings > General and check the following details
Set the Paid Submission to YES instead of the DefaultNO. This way, users will be redirected to the Price Plans before submitting a listing into the Directory. If you define this option as NO, users will be able to add listings without any restriction for free.
The Default option is better suited for users who want to grant free access without charging for added listings. Instead, the admin can be monetized by using the Ad Campaign System, when certain users want to leverage their added listings into the Directory.
To learn more about all the supported and non-supported plugins for ListingProWPGO HERE.
ListingPro was built as an end-to-end solution from scratch so our users don’t have to use third-party plugins for core directory features. So we only support the 3rd party plugins that are mentioned here. But we do support shortcodes, so you can use any plugin that supports shortcodes, as long as you understand that NO TECHNICAL SUPPORT IS AVAILABLE FOR THIRD-PARTY (3rd-party) plugins that are officially not supported. Some plugins may require custom integration.
A lot of the plugins may give you a shortcode, a widget option or even add-ons for WPBakery Page builder (Formerly Visual Composer). In such cases, you’ll be able to use the plugin.
For settings and specific functions to be applied with ListingPro Core which isn’t fully compatible you can request for customization service.
ListingPro is integrated with Nextend Social Login, which is a free WordPress plugin. Social login allows visitors and listing owners to login without having to enter username and password.
There are three social media platforms (Facebook, Twitter, and Google) that are integrated and ready to use for free in the ListingPro WordPress Directory Theme.
In order to find these settings, simply go to WordPress Dashboard > Settings > and find the respective name Nextend to configure the platforms you want to enable the registration and login.
Follow the step by step instructions on how to configure your Social Media Login APIs:
How to configure Facebook Login Correctly?
How to configure Twitter Login Correctly?
How to configure Google Login Correctly?
Nextend Connect Plugin, you can create an easy and customizable way to interact with your users while signing up an account on your Website.
Each Social Media Application will be divided into 3 different plugins which allow you to insert APIs Keys, Secret Keys and IDs referring to the Social Media defined for users registration.
To find The Next Connect, go to your WordPress Dashboard > Settings and you’ll notice 3 separated sections to configure the Social Login Buttons.
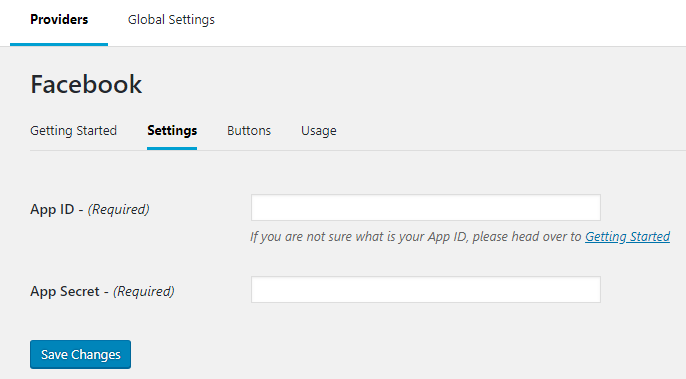
Nextend FB Connect
We’ve seen that some users somehow get lost while setting up the configuration to properly work with Social Media Logins.
So, before we get started, remember that for this step you have to be fully working with SSL. If you haven’t configured it yet, it’s recommended to conclude this step and then follow the steps below.
SSL is an important complement that should be added while setting up your Social Login. It’s recommended because we’re asking permission to get access to user’s credentials to conclude the account sign up. Please, if you have tried to include Social Logins before without SSL, revise your settings and include them where it’s requested
First Let’s start with the Facebook Login
FACEBOOK
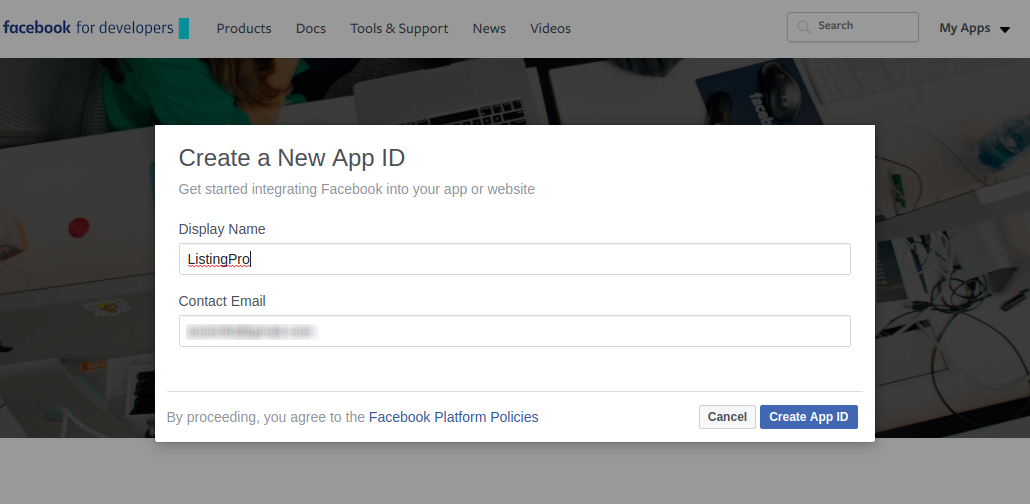
To start with, you have to go to the Facebook for Developers page and Log-in with your Facebook Account
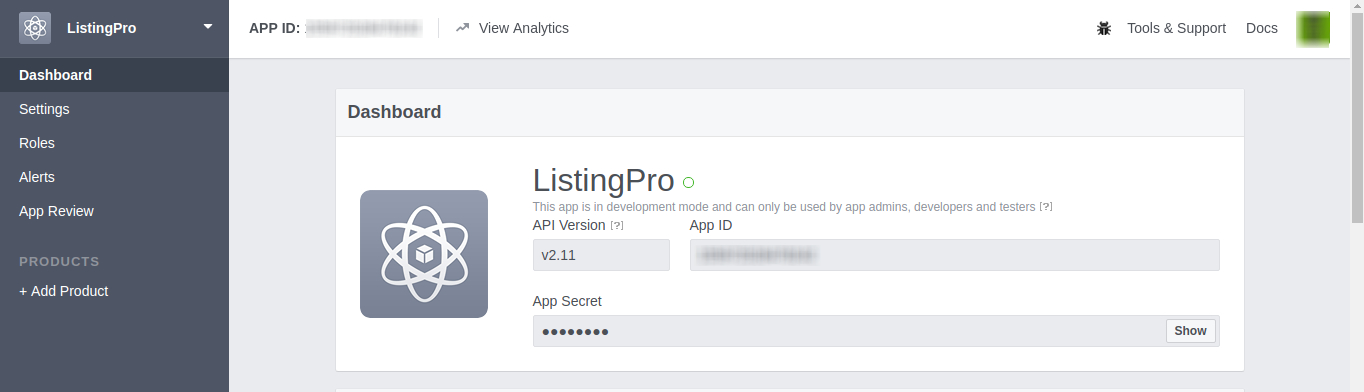
Let’s click on the Create App ID
Now on our Dashboard, simply copy the APP ID and APP Secret and paste it into the Nextend Facebook
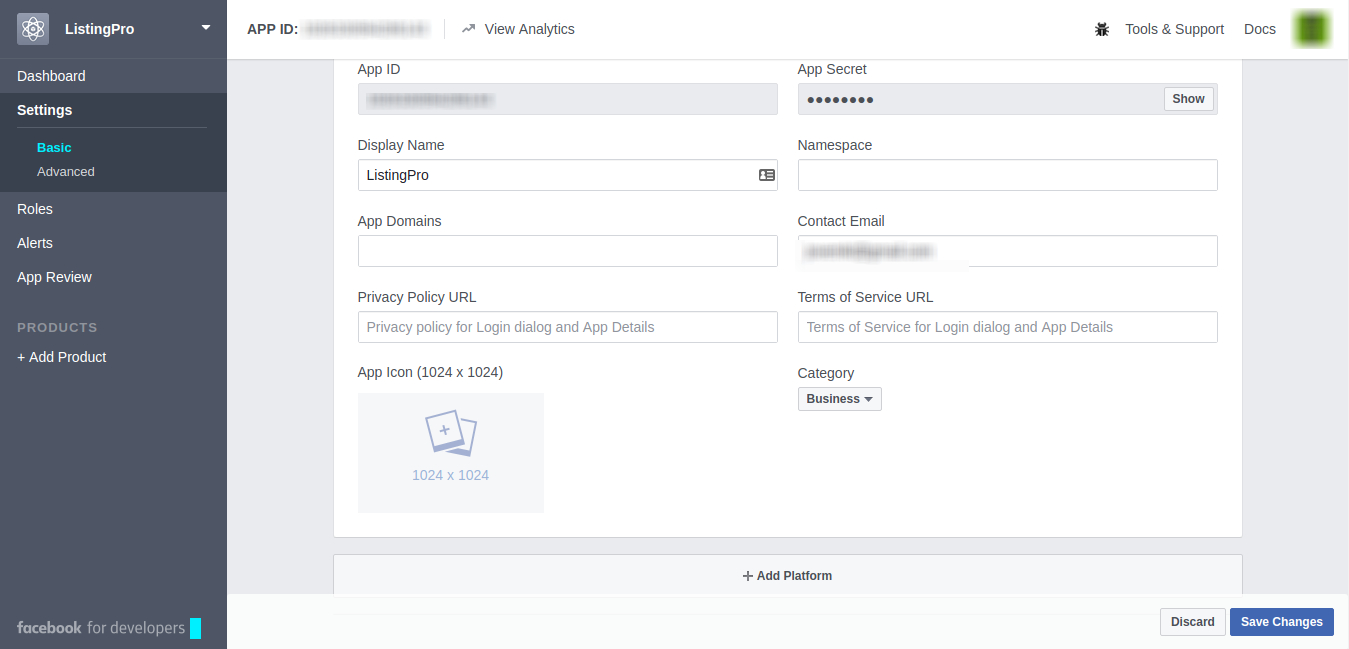
Now, in the Settings > Basic we have a few more options that could be interesting to include in our APP, in case if you already have your Privacy Policy URL and Terms of Service URL, include them. Also, you can customize your APP and add an Icon and choose the Category.
For now, Let’s only add the Category that best represents our Website
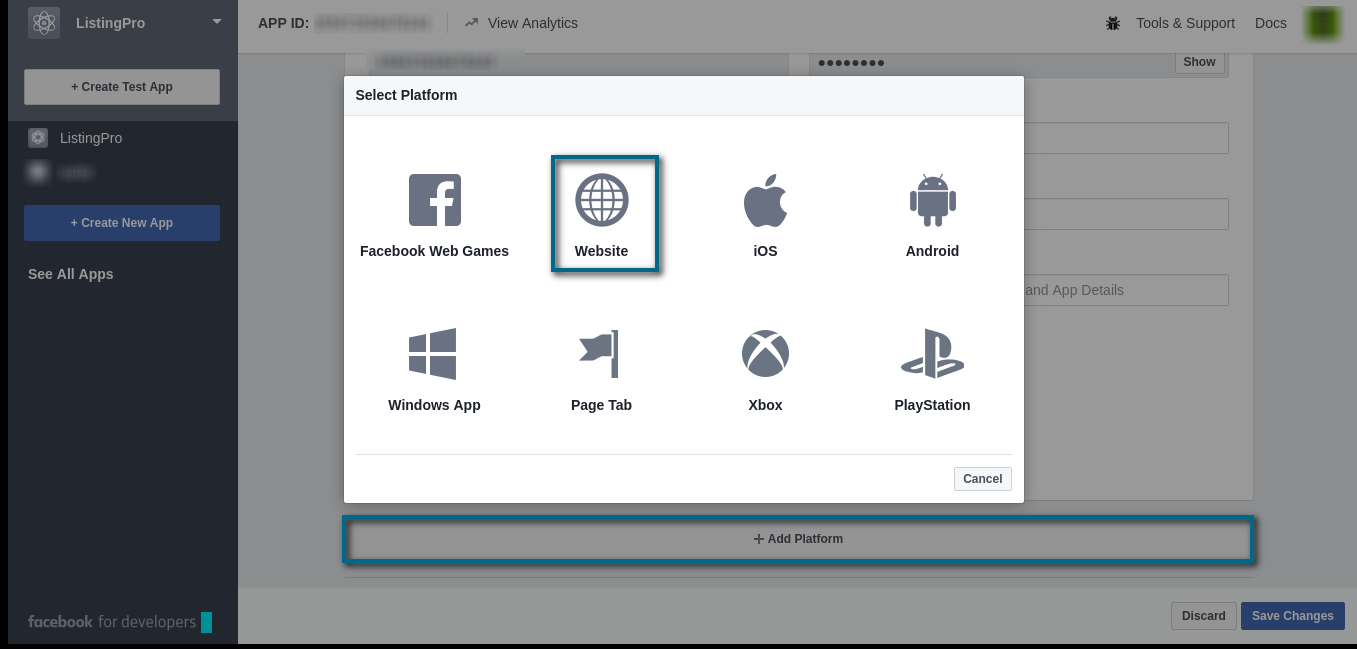
After setting your Category, scroll down the page and click on the + Add Platform
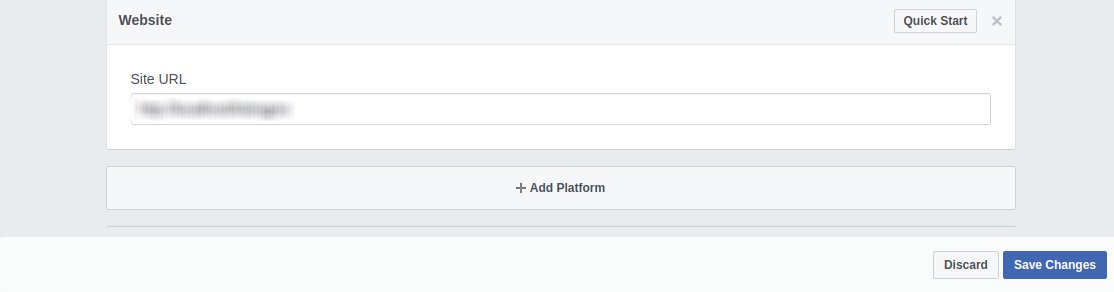
At the + Add Platform choose Website and insert the full URL of your site (including HTTP or HTTPS and insert the / in the final of your URL) Click on Save Changes.
Now, insert the same URL into your APPDomains and Save Changes.
Remember that you can customize your APP with Icon, Terms & Privacy later on
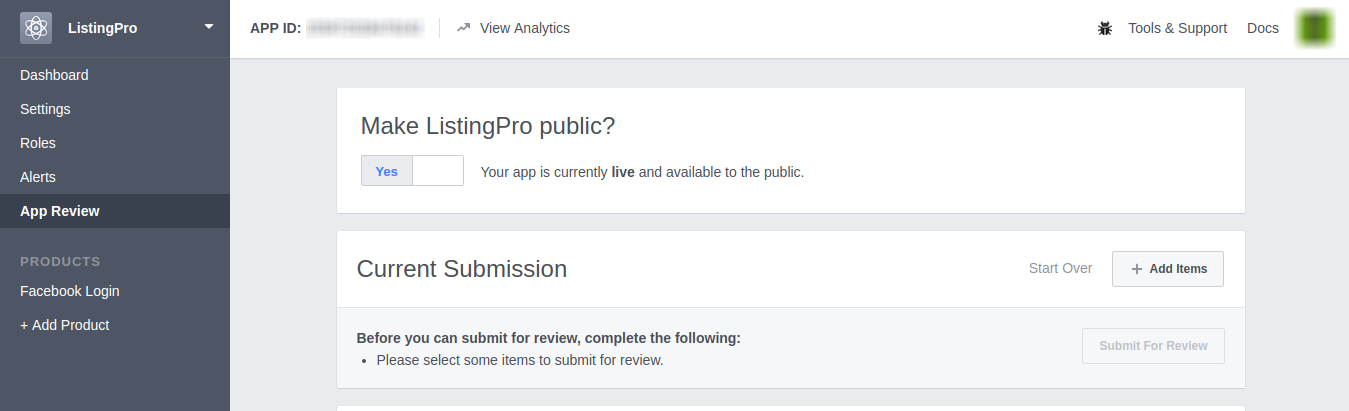
Now, go to your App Review and make it Public. and Save the Changes.
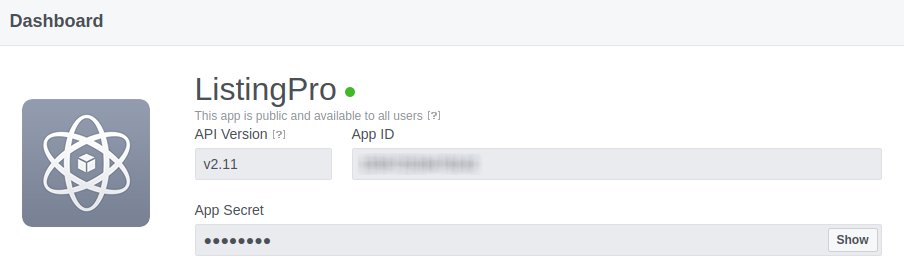
Your APP will now have a green circle on the Dashboard.
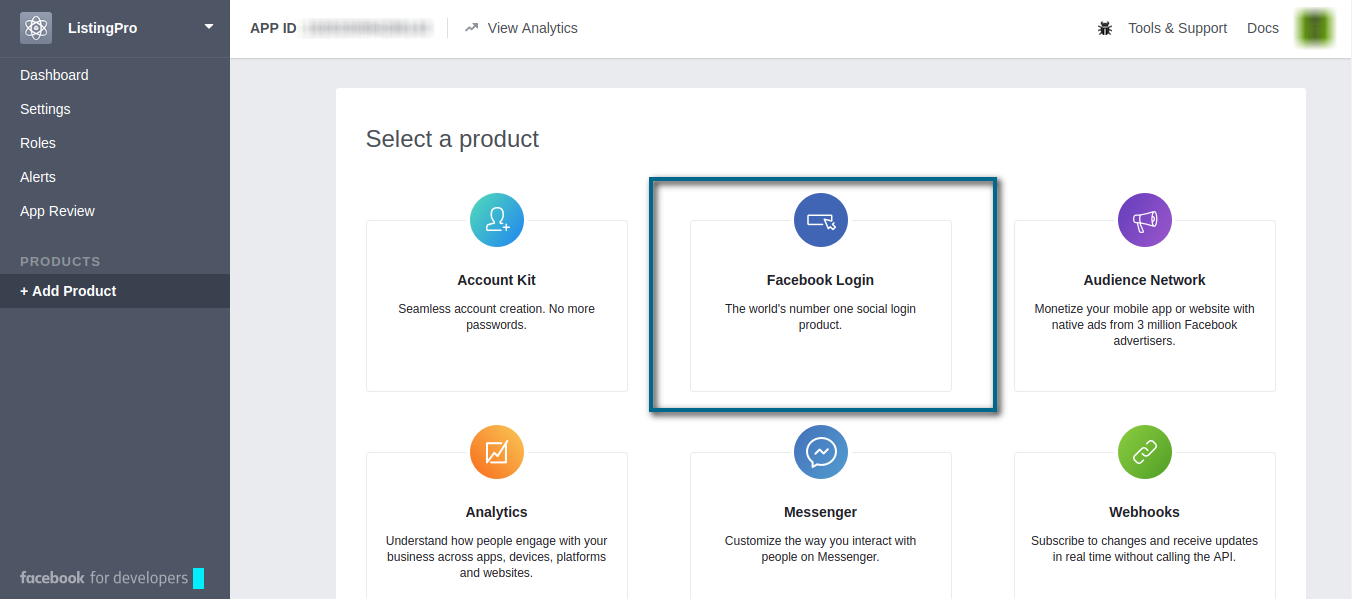
Now, one of the most important thing to make your Facebook Login really work in your Signup Homepage, we should go to + Add Product and include the Facebook Login.
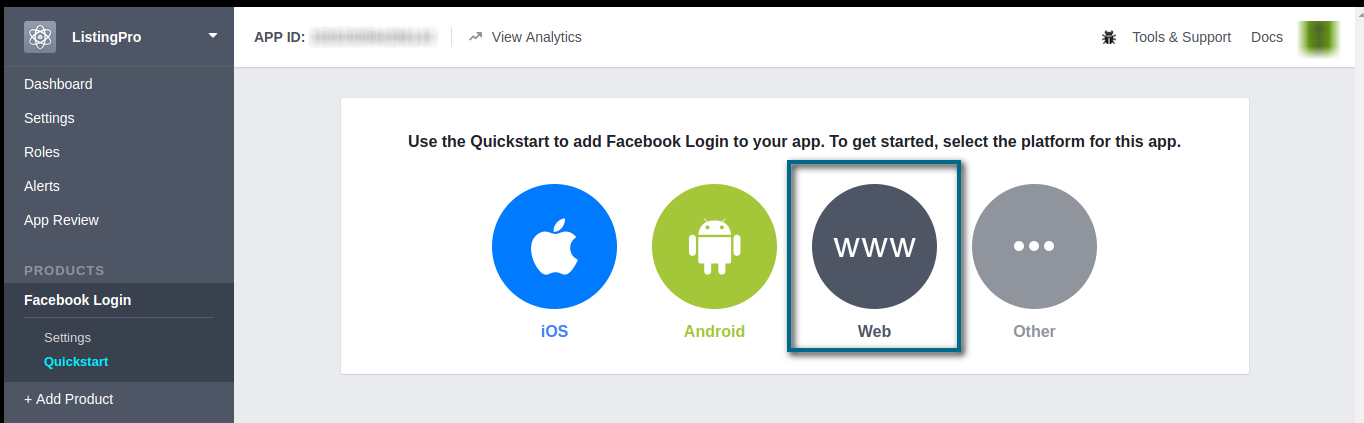
After clicking on the Facebook Login, select the Web option.
Check if your Website URL inserted at the beginning is correct, and go to the Settings of your Facebook Login.
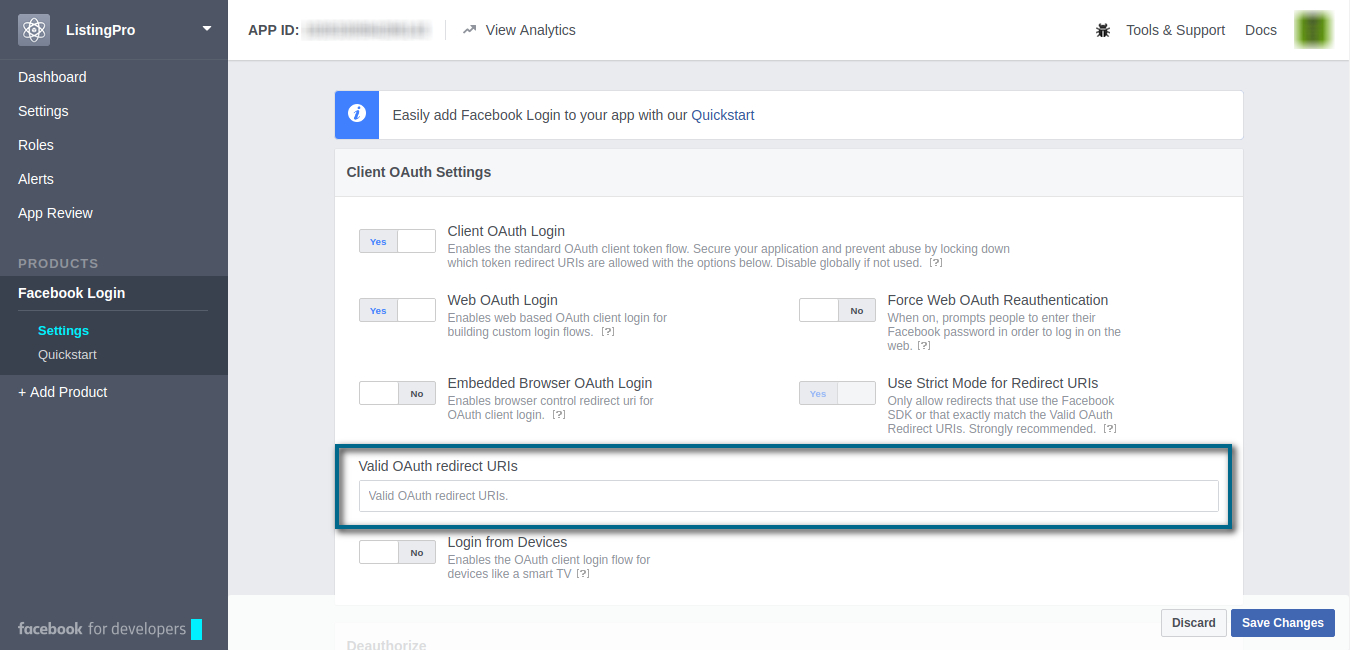
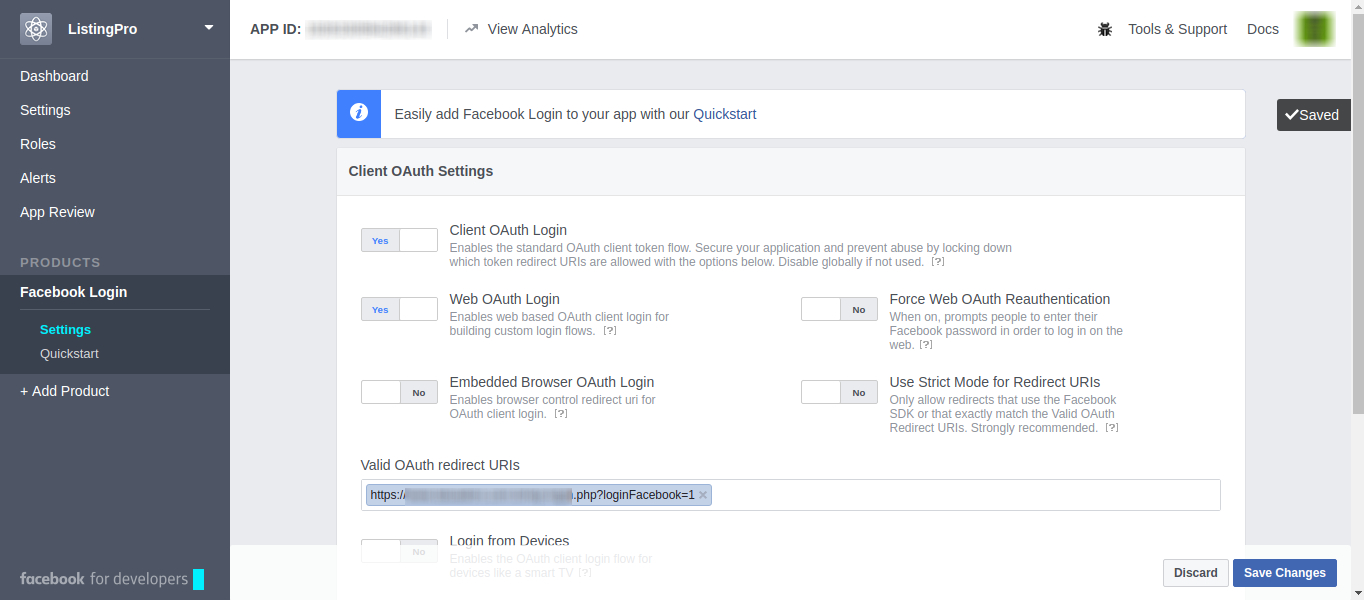
Here, we’re going to add the button address to our Signup. Go to your Website’s Homepage, and copy the link address of your Facebook Button. The link should look like this: https://your-website/wp-login.php?loginFacebook=1
Add this link to validate the OAuth redirect URIs. After that, we’re ready to use our Facebook Login.
Our application is all configured and working.
We haven’t covered all of the available settings, in case you want to include Icon, links to your Terms and Privacy, and to get users username, location, birthday, etc, you should go to your App Review, and Start a Submission. More advantaged settings should be accompanied by the Facebook Documentation to understand what others advanced settings are capable of and what it affects in your application.
Nextend Twitter Connect
We’ve seen that some users somehow get lost while setting up the configuration to properly work with Social Media Logins.
So, before we get started, remember that for this step you have to be fully working with SSL. If you haven’t configured it yet, it’s recommended to conclude this step and then follow the steps below.
SSL is an important complement that should be added while setting up your Social Login. It’s recommended because we’re asking permission to get access to user’s credentials to conclude the account sign up. Please, if you have tried to include Social Logins before without SSL, revise your settings and include them where it’s requested
First Let’s start with the Twitter Login
Twitter
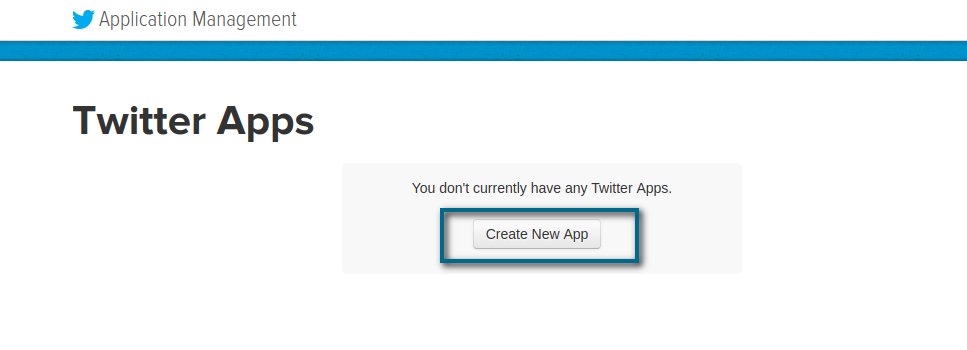
To start with, you have to go to the Twitter Apps page and Log-in with your Twitter Account
Let’s now create our Twitter App.
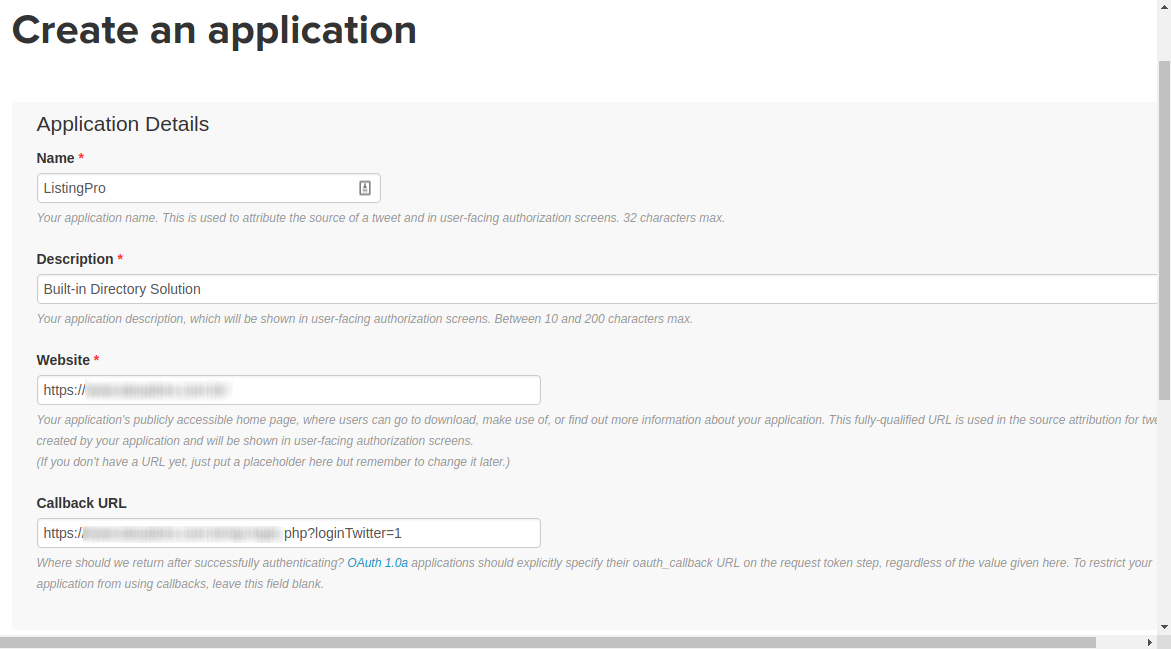
We’ll have a few settings to insert our Website details. For the Oauth Callback section, don’t forget to include your Button Address Link. The link should look like this: https://your-website/wp-login.php?loginTwitter=1 and you can find it going to your Website Homepage in the Singup popup. Copy the Link Address of your Button.
After creating your Application name, Description, and added your Website URL and the Callback URL, accept the Developer Agreement, and click on the Button to create your Twitter Application.
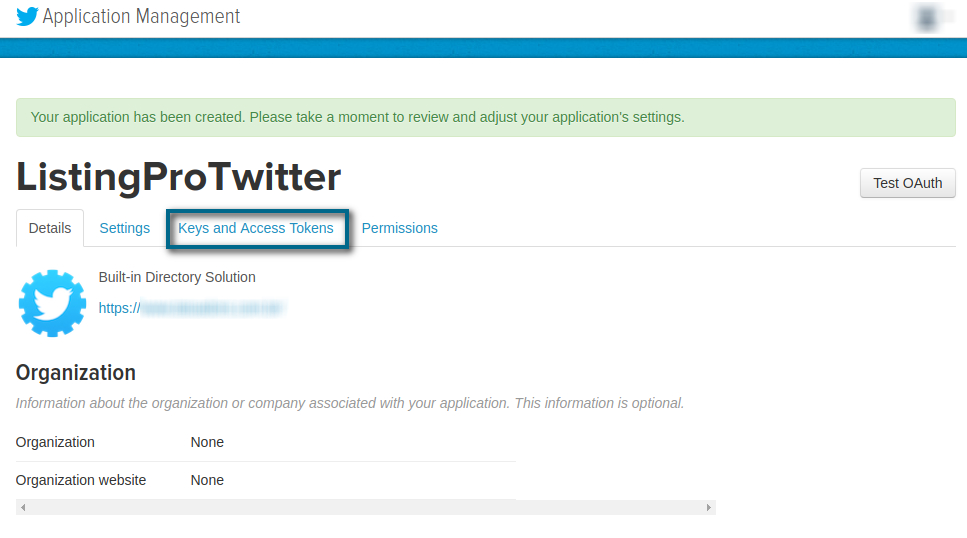
We’ll be redirected to our Application Panel, and here let’s click on KeysandAccess Tokens
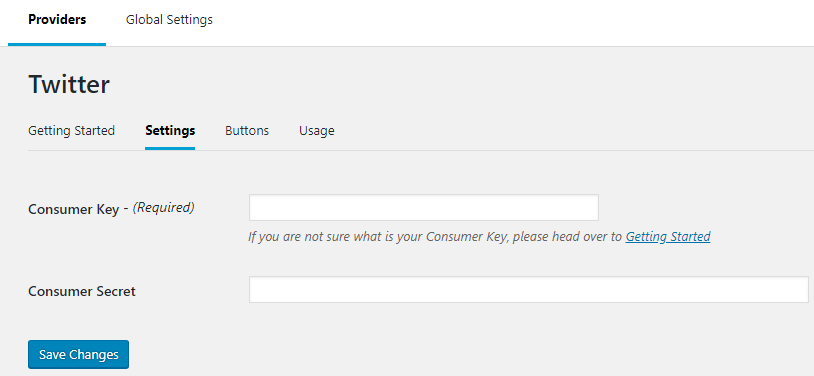
Copy and Paste your Consumer Key and your Consumer Secret into your Nextend Twitter.
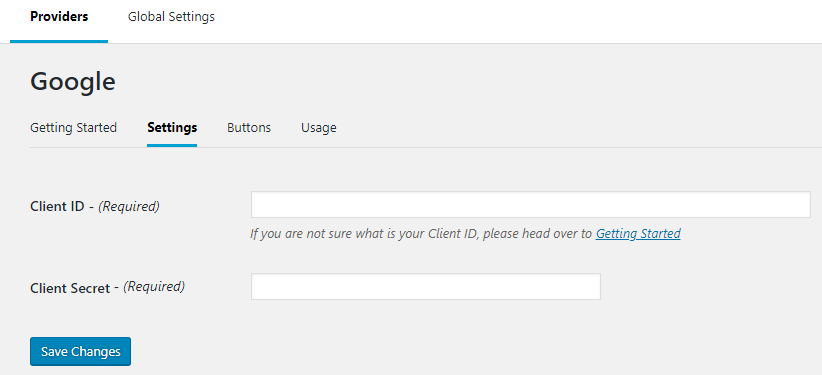
Go to your Nextend Twitter Plugin and paste the codes for the Consumer Key and Consumer Secret.
Now, let’s see if our Twitter Login is working as expected. Let’s go to our Website Homepage and try to Signup using our Twitter Button.
Nextend Google Connect
We’ve seen that some users somehow get lost while setting up the configuration to properly work with Social Media Logins.
So, before we get started, remember that for this step you have to be fully working with SSL. If you haven’t configured it yet, it’s recommended to conclude this step and then follow the steps below.
SSL is an important complement that should be added while setting up your Social Login. It’s recommended because we’re asking permission to get access to user’s credentials to conclude the account sign up. Please, if you have tried to include Social Logins before without SSL, revise your settings and include them where it’s requested
First Let’s start with the Google Login
GOOGLE
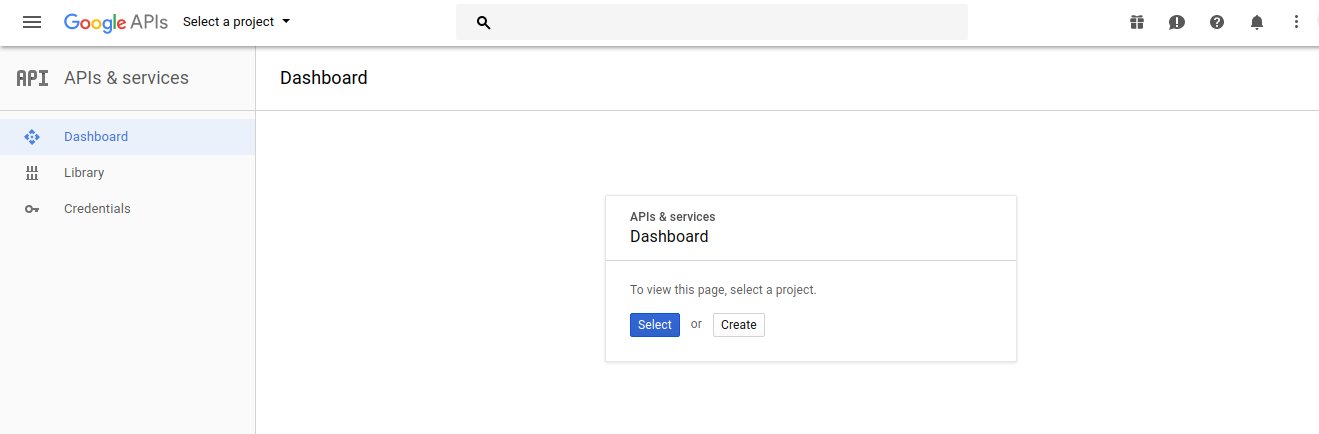
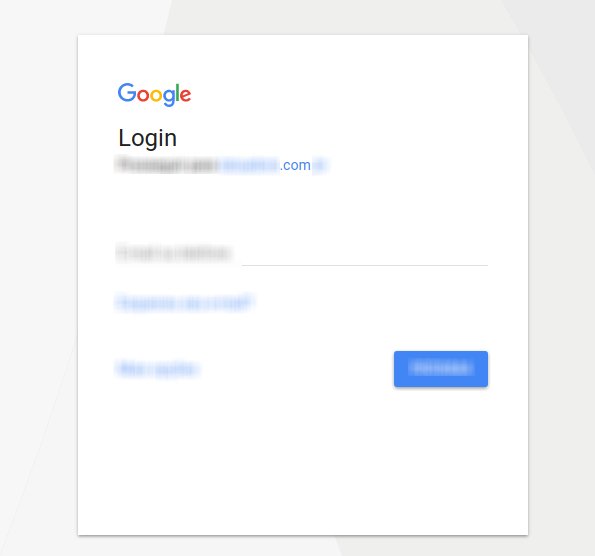
To start with, you have to go to the Google APIs Console page and Log-in with your Google Account
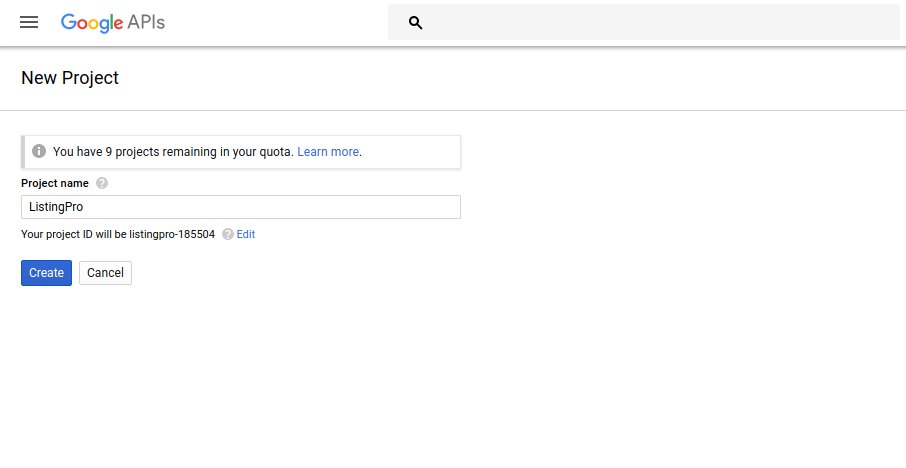
Let’s then create a New Project to configure our Google+ Button. First, Go to your Google APIs Dashboard and Start a Project
Then, Let’s give a name to our project, simply to be easier to identify in case you’ve added more projects to your GoogleAPIs
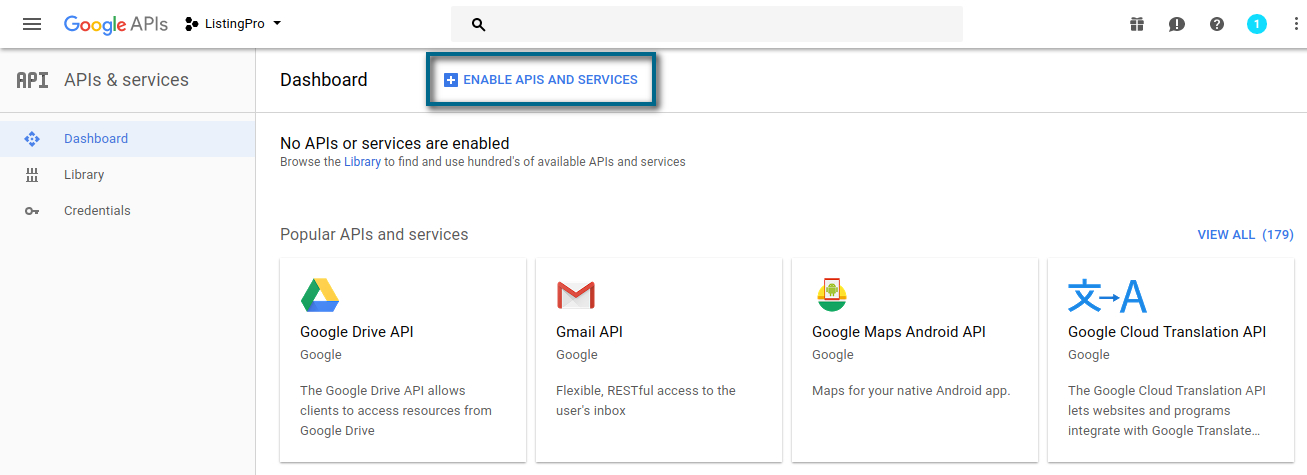
After having defined your Project name, you’ll be redirected to your new Project Dashboard with some more options… Let’s enable the API and Services right above.
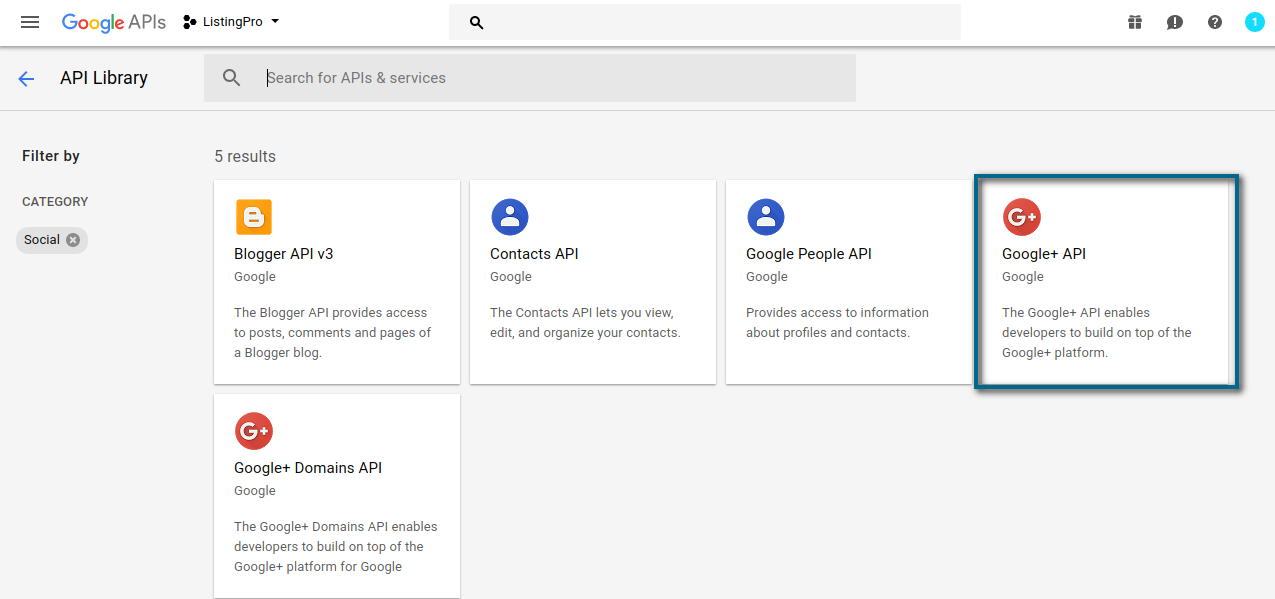
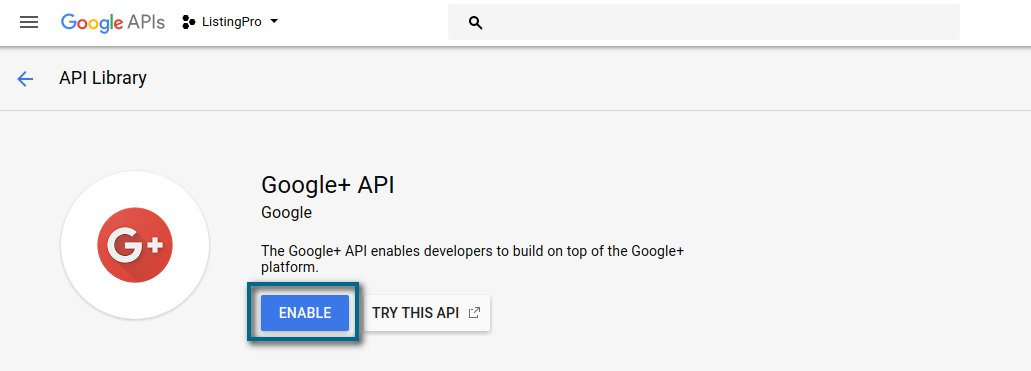
Now, let’s find the Social Login to our Google+ and enable it.
Click on the Enable Button
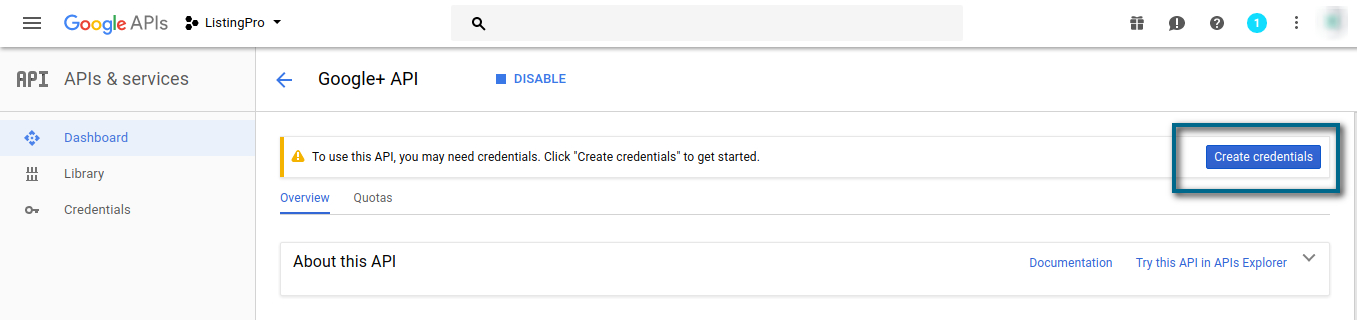
Now that we have enabled our Google+ API, we’ll have to create the credential to add to our Nextend Google
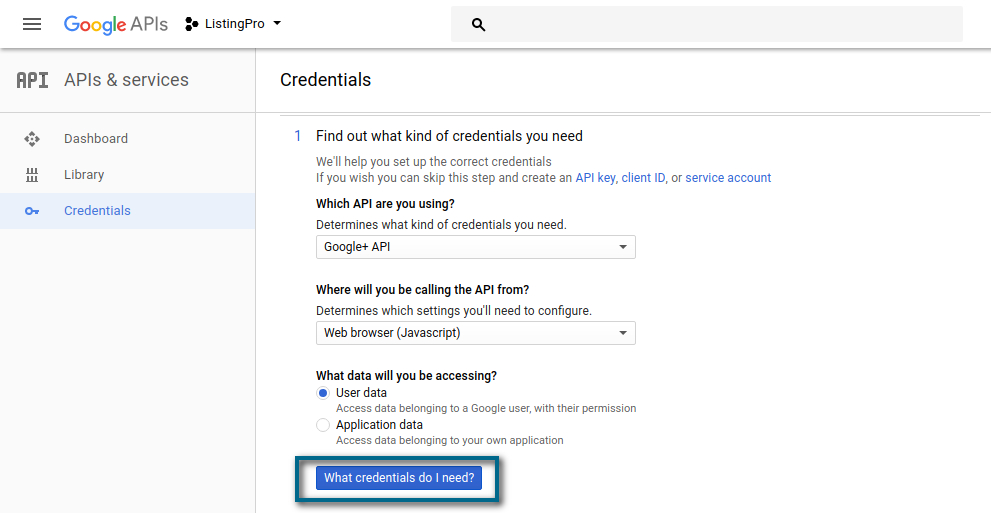
Set the API as followed below…
Click on the What credentials do I need?
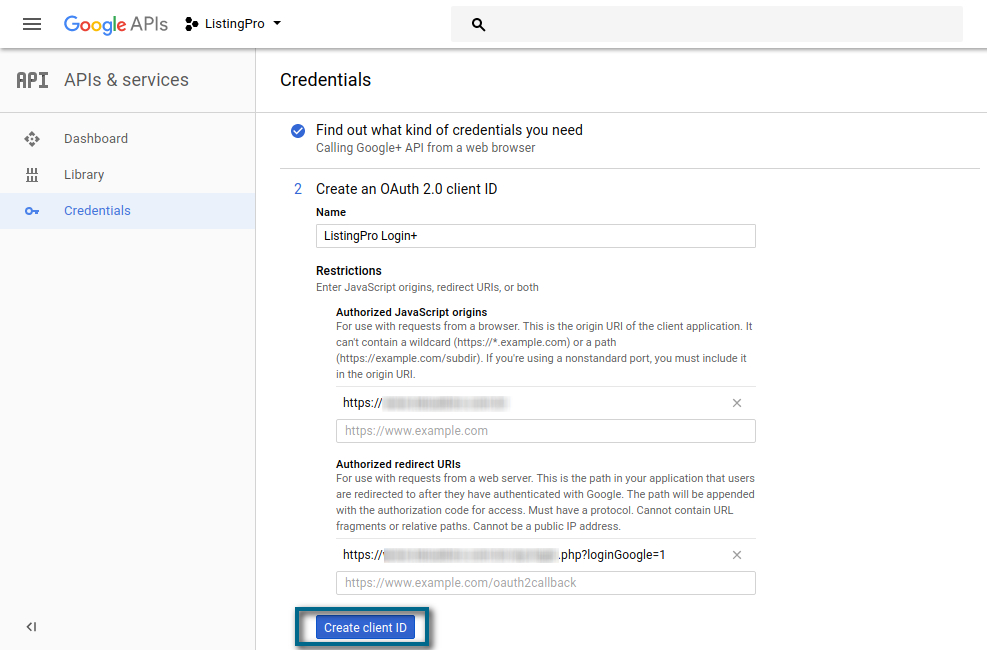
Now, it’s time to define your API name, add your Website URL, and copy the link address of your Google+ Button on your Signup Homepage.
After adding these credentials, simply click to Create your client ID
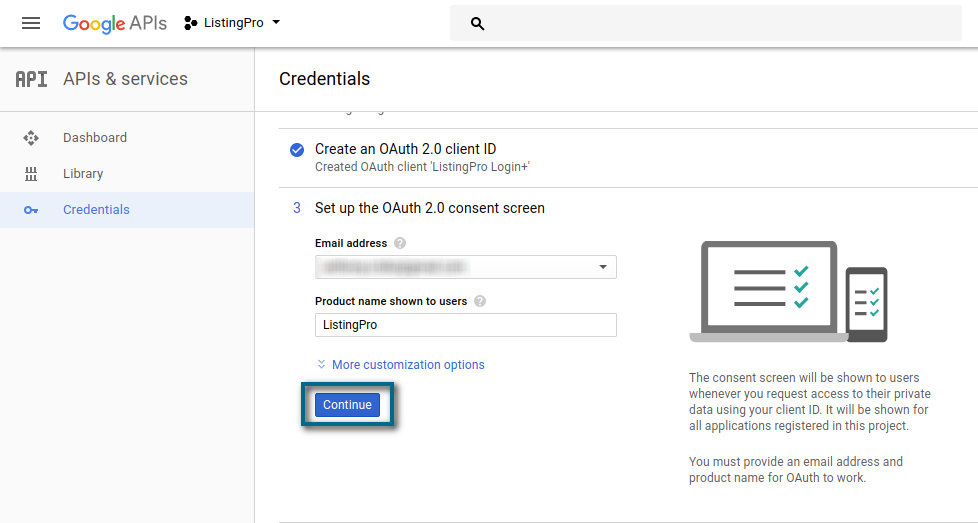
Add your Product name that will be shown to your users and click on Continue.
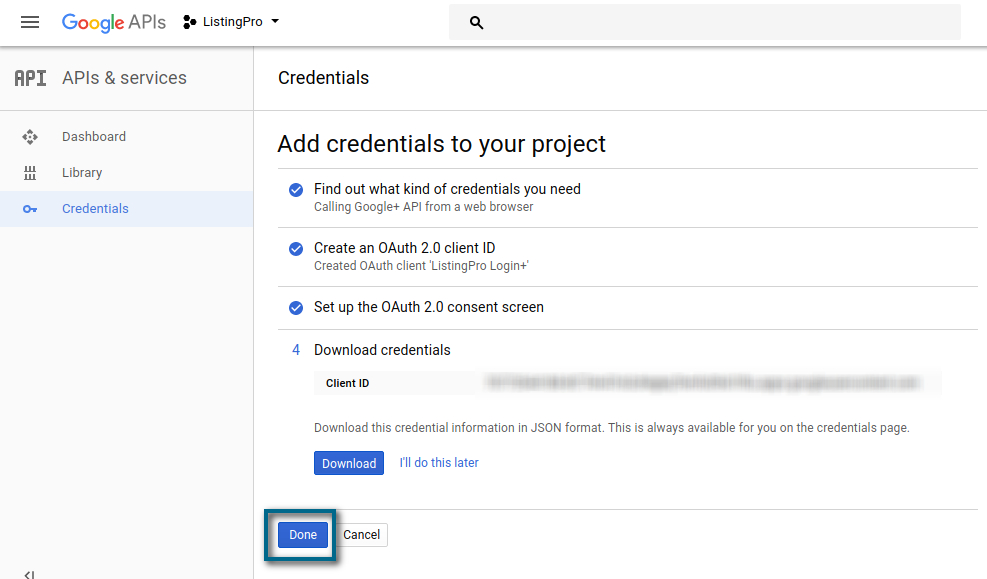
You can add more customizations if you want to. In case of doubts always check into the APIsDocumentation for more details.
Now, you can copy your Client ID and paste it into your Nextend Google. Click on the Done Button.
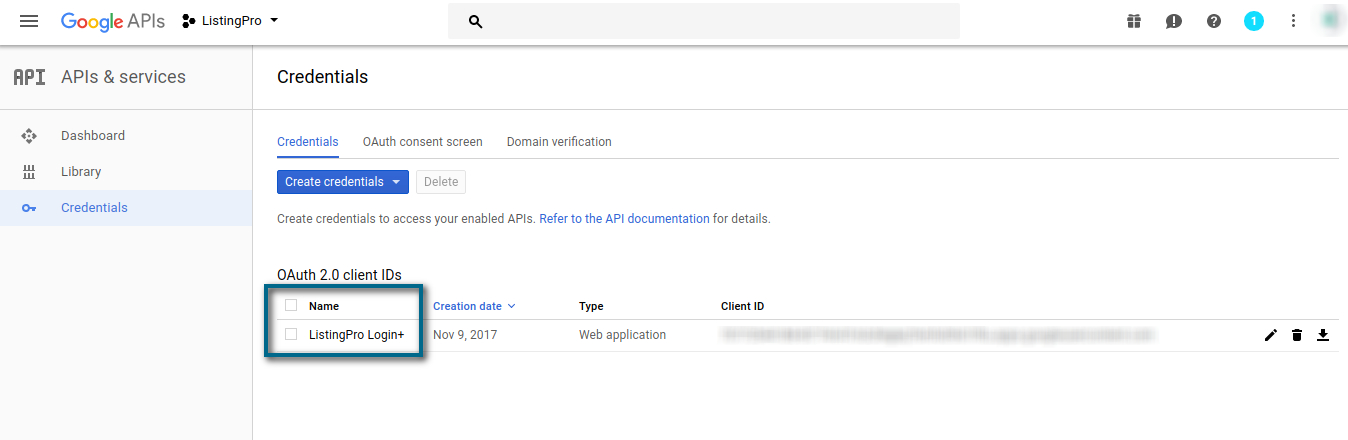
You’ll be redirected to your Credential Panel, where you’ll be able to manage more settings in your application.
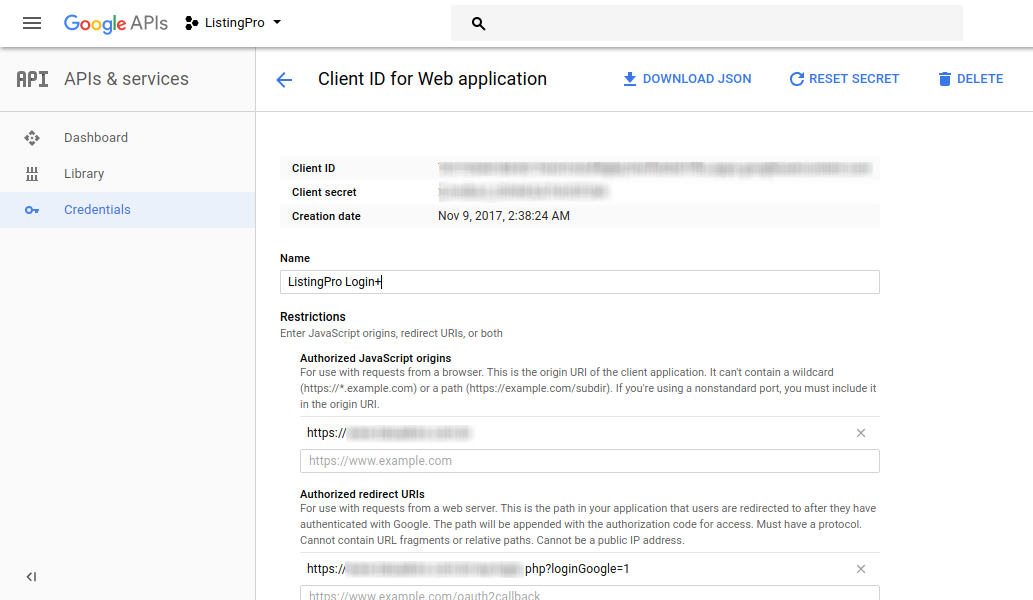
Find your Client ID and click on its name…
You’ll get a full detail of your application, and here we’ll copy the Client Secret and add it to our Nextend Google
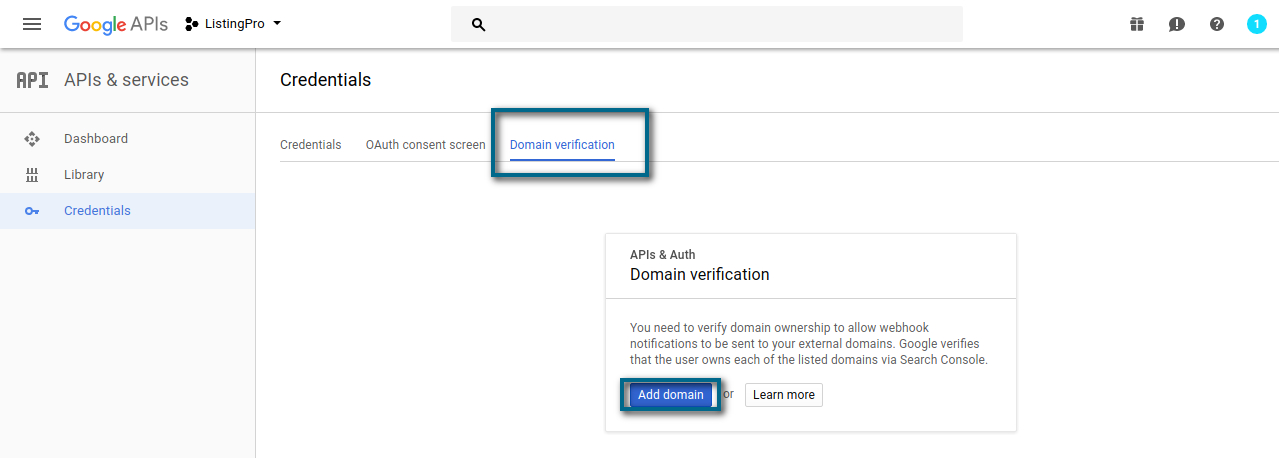
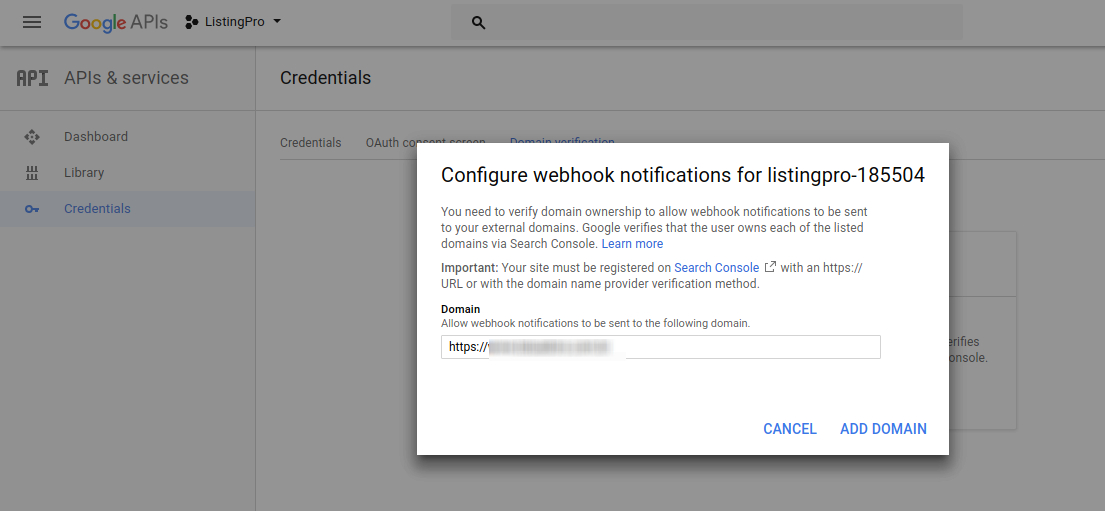
Go back to your Credential Panel and let’s verify our Domain in our application.
Insert the URL of your Website to verify your Domain.
Remember, if you haven’t verified your Domain in your Google Search Console, Click Here and verify your Domain.
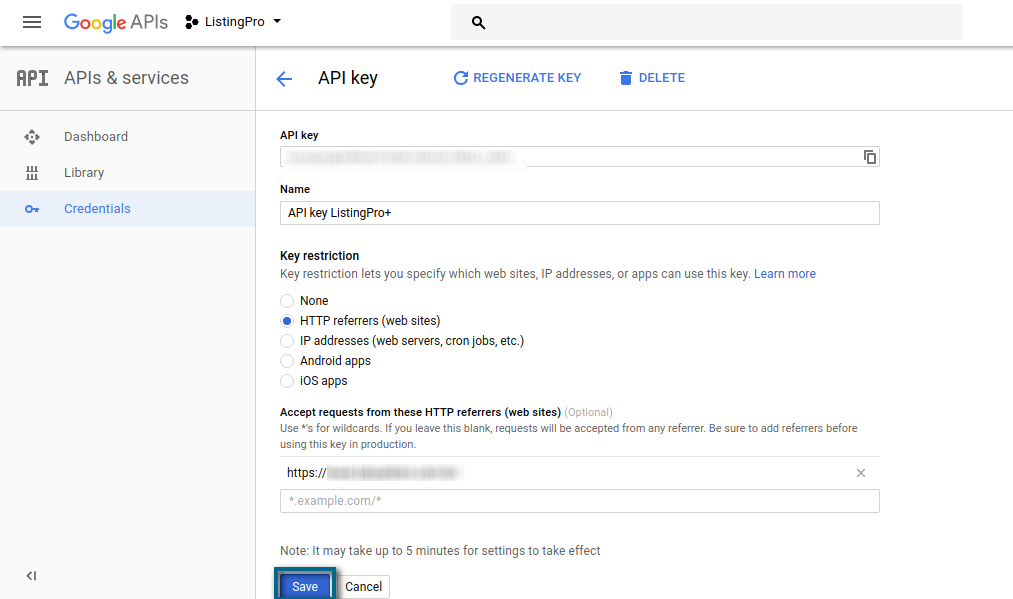
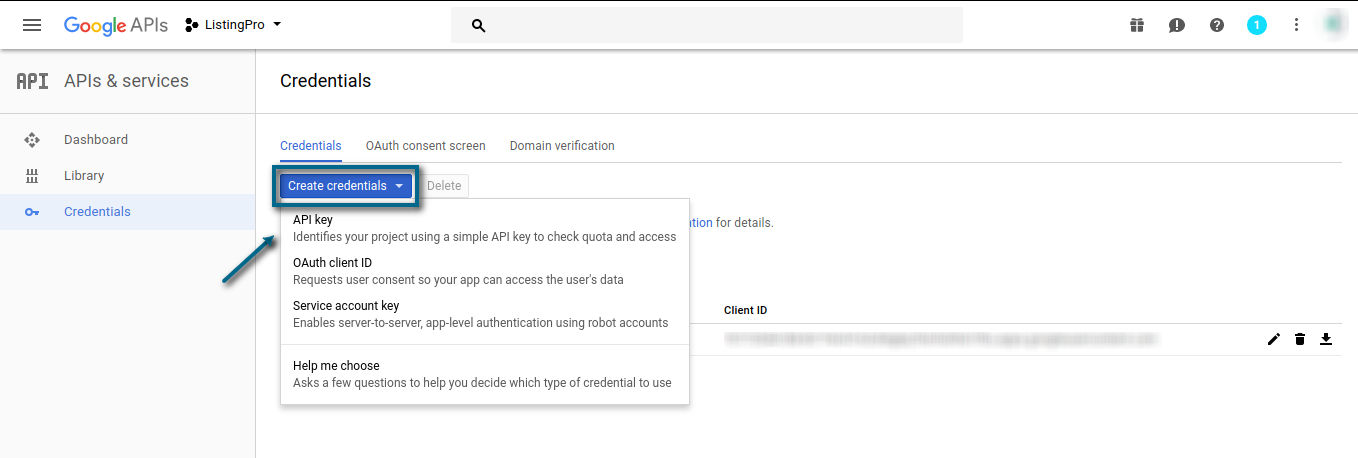
After having done this, Let’s back to our Credential Panel and set our API Key.
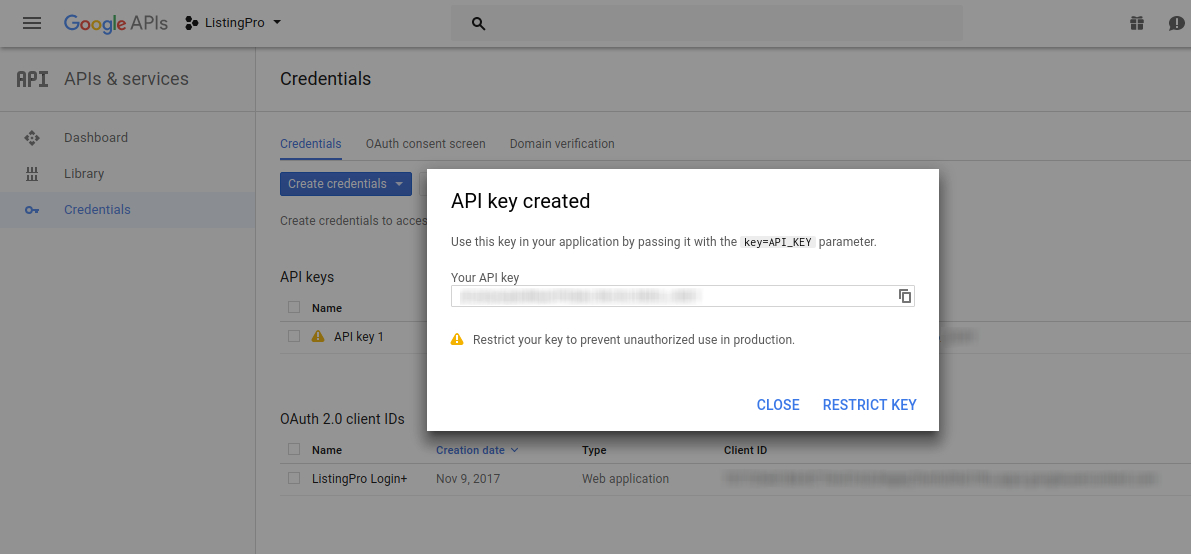
Copy your API Key and paste it into your Nextend Google, and also, it’s recommended to restrict the key.
Follow the example below to restrict your API Key. After that, you can click on Save Button.
Now, let’s test our Google+ Login in our Website Homepage Signup and see if everything works as expected.
Remember that after creating your API Key and inserting the Restriction, it may take 5 minutes to take effect.