How to (MANUAL) update ListingPro WordPress theme?

ATTENTION! PLEASE BACKUP BEFORE PROCEEDING. WE ARE NOT RESPONSIBLE FOR ANY LOSS.
If any customizations have been made to the parent theme files, it will be overwritten after the update. So we highly recommend you to install child theme and apply all your customization.
PART 1: DEACTIVATE AND DELETE LISTINGPRO THEME

STEP 1: Login to WordPress admin dashboard.

STEP 2: Go to Appearance > Themes

Make sure ListingPro theme is installed and activated.

STEP 3: Select any other theme (Example: Twenty Seventeen), and click Activate

Delete option on an active Theme will not be available until another theme is activated.

STEP 4: Click on ListingPro and details window pops-up.

STEP 5: Click Delete

STEP 6:  Click OK from popup window.

Incase you are unable to delete the theme then go to next steps and delete the plugins first.

PART 2: DEACTIVATE AND DELETE LISTINGPRO PLUGIN

STEP 1: Go to Plugins > Installed Plugins

STEP 2: Under ListingPro Plugin, click Deactivate

STEP 3: Click Delete

STEP 4: You must repeat the above steps to delete the following plugins, ListingPro Ads and ListingPro Reviews.

If the update logs indicate there was an update include for any of the included third-party plugins such as Nextend Social Login, Redux Framework, and Page Builder Plugins (WPBakery or Elementor) then also repeat the above steps.

PART 3: INSTALL LATEST LISTINGPRO THEME
Login to ThemeForest, go to themeforest.net/downloads and click the Download button and select Installable WordPress file only next to ListingPro.

STEP 1: Go to AppearanceThemes

STEP 2: From the top, click Add New

STEP 3: Click the Upload Theme

STEP 4: Click Choose File

STEP 5: Browse and locate the latest theme file listingpro.zip

STEP 6: Click Install Now

STEP 7:  Click Activate

During the upgrade, the Easy Setup Assistant Wizard will be disabled. If you haven’t deleted the old version of ListingPro

PART 4: INSTALL LATEST LISTINGPRO PLUGIN

STEP 1: From the notification box, click Begin installing plugin

STEP 2: Under ListingPro Plugin, click the Install

Look for the following notice, Plugin installed successfully.

STEP 7:  Click Activate

 Congratulations! Now you have successfully completed the Theme & Plugin update.


How to install a child theme?

INSTALING CHILD-THEME FROM WORDPRESS DASHBOARD

STEP 1: From the left-side menu, go to AppearanceThemes

STEP 2: From the top, click Add New

STEP 3: Click the Upload Theme

STEP 4: Click Choose File

STEP 5: Browse and locate the theme file listingpro-child.zip, and click Install Now

STEP 6:  Click Activate

After the above step if you got an error saying, Are you sure you want to do this? Please try again. Don’t worry you are not alone, read this.


Why I’m facing so many issues after some updates?

Most of the issues aren’t related entirely to ListingPro and it’s functionalities or code quality.

One of the biggest issues is due to the MySQL server (whether it be on localhost or shared hosting or cloud server). You can learn more about MySQL at this page (MySQL)

It’s correct to affirm that most users are creating the directory structure, activating/deactivating its features, making a lot of saving on the database and so forth.

some changes can be easily fixed by just cleaning the browser cache after some URL access that was sending/requesting a POST or GET on those pages. If you’re using Google Chrome you can search for apps that act like CCleaner, as same as Firefox.
Meanwhile, there are some other settings that act directly into the database of your server. Yes! you may clean your browser cache but some others will still persist on your database.

Depending on your server settings, probably you have a few options like the following screenshot:

BASIC SETTINGS

MYSQL SETTINGS

APACHE SETTINGS


On localhost, we typically don’t care about these settings at all, but when we’re talking about a server, it’s always a good idea to identify these settings and fill out what’s still missing. Databases also have its own UTC, Language, and encode settings.

It’s recommended that you include your country’s UTC and language as well. Bear in mind that the same UTC and language should be also referred to the standard UTC and language that you’ve inserted into your WordPress Dashboard.

What do these changes will solve?

These changes will solve most issues related about “operational hours“, “open now“, “closed now“, “day off“.

If you leave these settings untouched as UTC 0, most likely that after some settings on your WordPress it will act with some errors due to the number of changes that have been made and with the previous settings attached with old tables created on your MySQL Database.

Remember that MySQL means that every data is correlated between existing tables, categories, users, etc. For more advanced users you can read more about the difference between MySQL and NoSQL

Also, after setting up these changes correctly and accordingly with your Country Base, make sure that your server also gives you some cache settings that can act directly with your database.

Memcached, Varnish, and others are also a good alliance that keeps your server and database running correctly… to know more about what Varnish and Memcached does, you can access these links (Memcached & Varnish).


Ok! I have these options on my server, and what now?

For development purposes and tests, you can disable these settings. When you finish testing your application, you can enable your cache settings on your server.

Also, there are many servers nowadays that after you finish your WordPress One-Click Installation, on your WordPress Plugins, you may find some W3 Cache, Breeze, or any other option that will work directly with cache and memory system. You can disable these plugins to allow you to make changes and see those changes being saved in your system. When you’re done editing your settings and ready to run your directory in production, you can enable these settings back.

In case you’ve installed a raw installation of WordPress on your server, you can search on WordPress Plugins, for cache plugins and a simple search on Google can give you a better understanding of which one is better or easy to work with. It will depend on your preferences and also on your experience.


What we’ve learned here so far?

Now you can understand and see more in detail on why some settings that we made on our ListingPro options don’t get into effect after some changes. Also, we have had a better idea of why the operational hours haven’t worked properly in upcoming updates and it was all due to the previous database that has had saved the previous settings.

When you finish your testings, remember that you need to create your backup at Theme Options > Import/Export and save the changes that you’ve set on your Theme Options. Also, you can make your WordPress backup to save your categories and other details regarding many other settings made specifically in WordPress Settings, simply go to WordPress Dashboard > Tools > Export

WORDPRESS BACKUP

THEME OPTIONS BACKUP


Does the Team give Support for Site Optimization?

For users that are newcomers on WordPress and aren’t aware of what a Site Optimization means, follow a short resume about it:

There are many ways to optimize our websites to deliver the information available on each pagelink.

Some of these optimizations refer to SEO, while others may be related to how your website speed behaves during frequent loading requests. Roughly 75% of websites are referred to optimizations in SEO, while 25% only refers to referral links that your website has while loading CSS, Javascript, Image, Videos or any other type of format that your site is responsible to load when some user requests a blog article or a service after searching for “restaurants” within your directory”.


Does the Team give Support for Site Optimization?

Unfortunately, we don’t give support for SEO, SEM, OptimizationsServer Maintenance, and any other that aren’t related towards our purpose. Our Team has total responsibility to deliver update releases, bug fixes, customization to implement and increase your directory by specific requests on particular features, support about how to setup correctly ListingPro Directory and relative activities.

The maintainability, server’s security, and how you interact with your settings, your directory, your business, and your customers… is solely your responsibility to understand, learn and apply changes that may be required, important, or relevant for your business directory.


How do I know that my directory is running in a good performance?

It’s not that hard but keep in mind that every single image that you upload to your directory do count as well. This is a process that should be taken since the beginning. Every image, videos, alt text, descriptions etc, should be added.

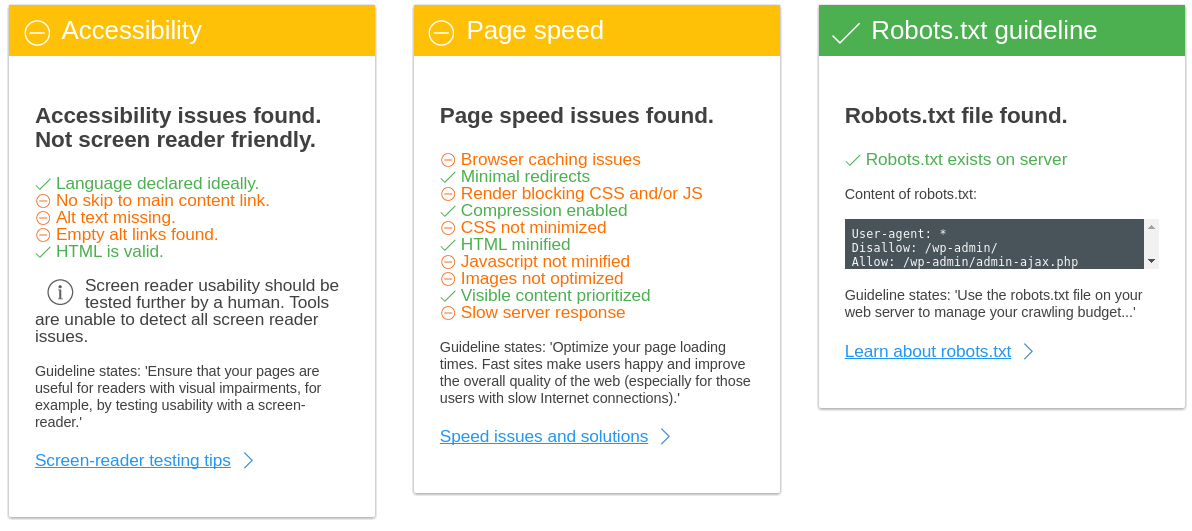
You may find many warning signals about your uploaded images during some loading speed tests. Here’s an example:

Every uploaded image you have access to your WordPress Media Library and also on your Server. Search for the uploaded images and start optimizing them. Even images that were uploaded by your customers. Insert descriptions, alt text, and others. Keep in mind that image resizing should be a priority to reduce the loading speed of these format elements found at your site. Whether it be on blog articles, category images, location images, and so forth.
Image Optimization can be made by external resources or by some WordPress Plugins

CSS & Javascript Loading Speed Requests

To increase the performance of your website, it’s also possible to optimize files such as CSS, Javascript, or others. This also includes even your uploaded plugins that may interact with pages and users requests as well. You’ll see details about these topics as the example below:

You can optimize these files using online services for free, and also you’ll find many articles regarding these topics. It’s a natural process that every online business should be aware of, before/after running your online business. To give some examples, you can use jscompress.com or also javascript-minifier.com and for CSS as well. These are just two options, but you may find more online services that can create your minified files.

You can also find many plugins for WordPress (free/paid) to compress these files and take care of your WordPress Performance. Some will do complete tasks such as, cache performance, database cleaner, minify and compress CSS/Javascript and Image files and so forth.
Remember, if you’re minifying and compressing these files on your own, please save a copy of your original files. This is for safety in case of an issue.

How do I find the correct way to apply these changes to optimize my directory?

Below are some links that may help you during your optimization:

Render blocking javascripts

Server response time

Leverage browser caching

Minimize redirects

Critical rendering path

Optimize CSS delivery

Avoid bad requests

Minimize DNS lookups

Avoid CSS @Import

Defer loading javascript

You can have other resources to follow along while configuring your optimization.

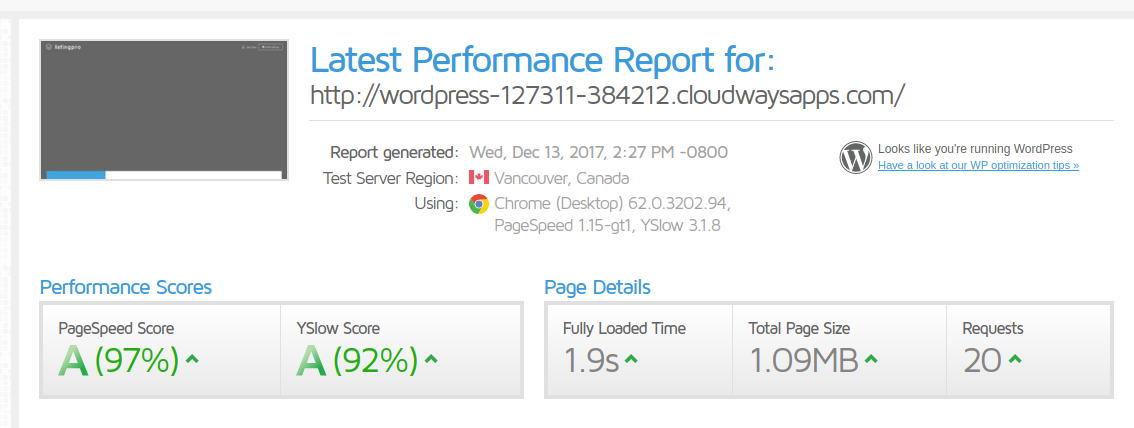
Where do I test my Website Loading Speed?

There are many alternatives that test your website loading speed. As a resume, and for the most popular found on the internet, you can make tests using GTmetrix or with Varvy. Each of these services will vary on how they deliver the information available for each section after the result. Varvy is more user-friendly and also has an understandable content for non-techie users. GTmetrix is robust and also gives a wide set of results divided by sections.

ATTENTION

If it’s your first time, read carefully before applying those changes. Also, don’t excite to search for Youtube videos on how to perform these tasks. If you don’t feel capable to perform such tasks, some of these services also offer their services to optimize your website.


I’ve excluded/lost the default pages on my directory. How to add them again?

Sometimes we may have made a customized page but then we forgot the other patterns of our default page and wanted to check on how to proceed, or maybe we were simply unaware and accidentally deleted one or more of the default pages.

In order to fix this, we have a few options that we can restore or recreate our default pages.

Go to Pages > Add New and let’s create for example the Submit Listing page

On this page, you can easily be found through the Visual Composer Elements, just go to the ListingPro section to find all the elements related to ListingPro.

These Elements are the ones that give the functionality of your default pages, to insert Pricing Plan, Submit Listing, Edit Listing, and Listing Checkout.

In case you have lost any other default page, you can check the Page Attributes. You’ll find the Page Attributes below the Publish

These Attributes give you the respective pages: Contact Page, Dashboard, Login Page, Payment Cancel, Payment Thankyou, Saved Listings.

Please, don’t forget to always create your backup on WordPress and also on Theme Options. In case of something similar happen, you can easily import your saved backup.


How to define Default Location on Map?

In order to include a default location for your map, follow the instruction below.

Go to Theme Options > Listing Settings > General and include the Latitude and Longitude of your country, state or city.

This default location will work on your map and also for the results not found on the search results page. This brings more empathy for the location that you’re working within your directory, and if in case some typed words don’t match the results, the default location will be shown for this scenario.

To find the Latitude and Longitude of your country/state/city, simply go to this link