How to sort Listings on Search Results?

If you want to change the order on your Search Results page and sort your listings differently, follow the steps below.

Go to Theme Options > Listings Settings > General

For Listings Order by, you have options to sort listings by:

  1. Title
  2. Date
  3. Most Viewed
  4. Most Reviewed
  5. Highest Rated
  6. Claimed
  7. Random

How to Renew an Expired Support?

Once the support is expired you must renew your support in order for our support engineer be able to respond to your technical support related questions. Also note that all support queries are answered only via help desk, and not via ThemeForest comments page or any email.

If you have found a bug in the product, you can report it to us and you do not need to have an active support for reporting a bug. Once you report a bug we will evaluate and provide a temporary fix as needed and will fix it in the next release. We can try to provide the patch as soon as possible but there is no guarantee on how long it may take. It all depends on the severity of the bug.

In order to extend or renew an item’s support offering, you must have less than 6 months of the existing support period remaining.

To renew the support component on an item, please follow these steps:

STEP 1: Log in to your  Envato Account

STEP 2: Hover over your username and click Downloads from the drop-down menu.

STEP 3: The download section displays a list of all the items purchased using your account.

STEP 4: Click on Renew support now! or Extend now next to the item you wish to renew the item support for

and that’s it!

See screenshot below

Renew

Extend

Why can’t I extend or renew support for an item?

You have more than 6 months support remaining on your current support grant

ATTENTION

If you have less than 6 months of remaining Support, it’s recommended to extend your support for ListingPro. This way we can guarantee the support to our customers as we’re working hard to keep the excellence of our Support Team.

For more details go to link

How Invoices Work?

Invoices work as a guarantee that the pricing plan was bought correctly into the specific options defined and chosen by customers.

These Invoices will show each listing that was already bought, and also some additional details that the admin can give in the invoices. Customers will also be able to print these invoices if needed.

Invoices will also be shown for each Ad Campaign bought by customers and the logic follows the same. Exhibiting purchase details, and contact information defined by the admin.

1 – Invoices by Listings & Packages end-user Dashboard

Invoices generated by after choosing a plan and creating the business listing, users will be able to see their invoices just by going to Dashboard > Invoices > For Listings

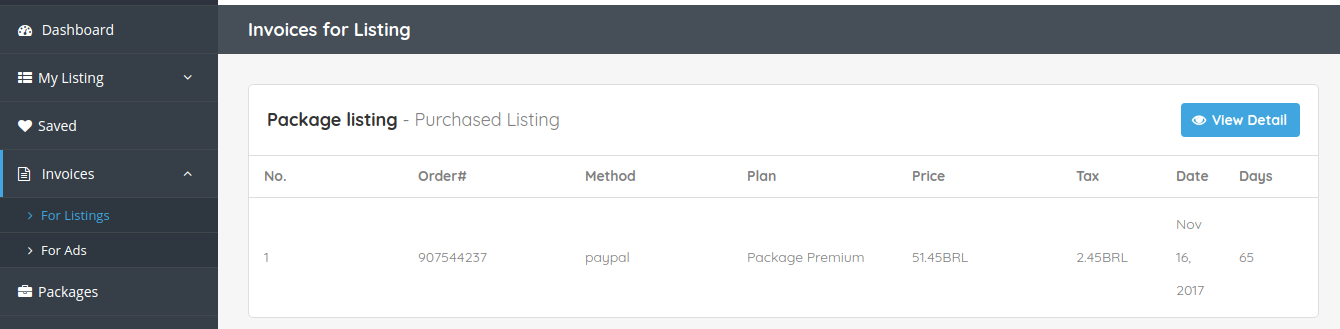
The example above details only one listing in our example, but on your end, it may have more listed in this section.

Let’s click on the View Detail and see the invoice for this Package Listing

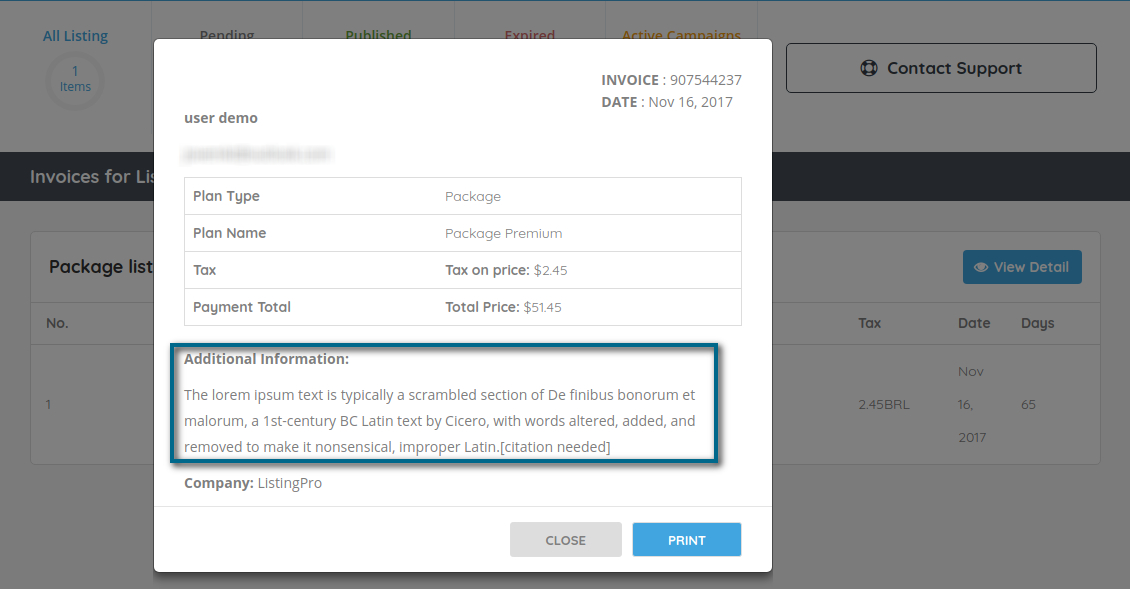
The detail shows us the name of our package, the type, tax (if included), and the total payment.

The additional information, admins can then create their own and insert more details about the procedure in case of refunds, terms & conditions, and any other important information that the admin considers to include. Exclusively to describe wire transfer procedures, time for the approvement listing, etc.

On the other hand, we have the invoices for Ad Campaigns which will perform the same result for end customers.

2 – Ads Invoices end-user Dashboard

To see the Ad invoices just go to Dashboard > Invoices > For Ads

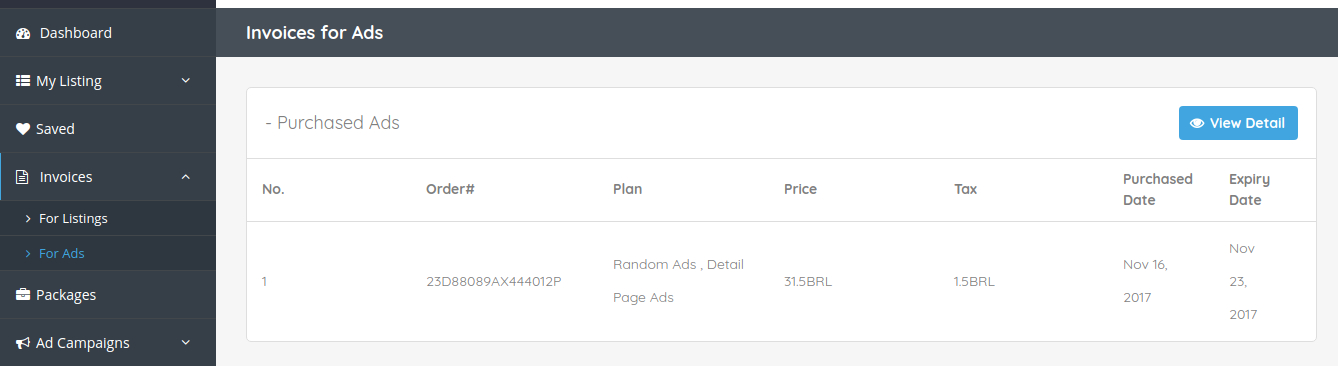
The example above details only one Ad in our example, but on your end, it may have more listed in this section.

Let’s click on the View Detail and see the invoice for this Campaign

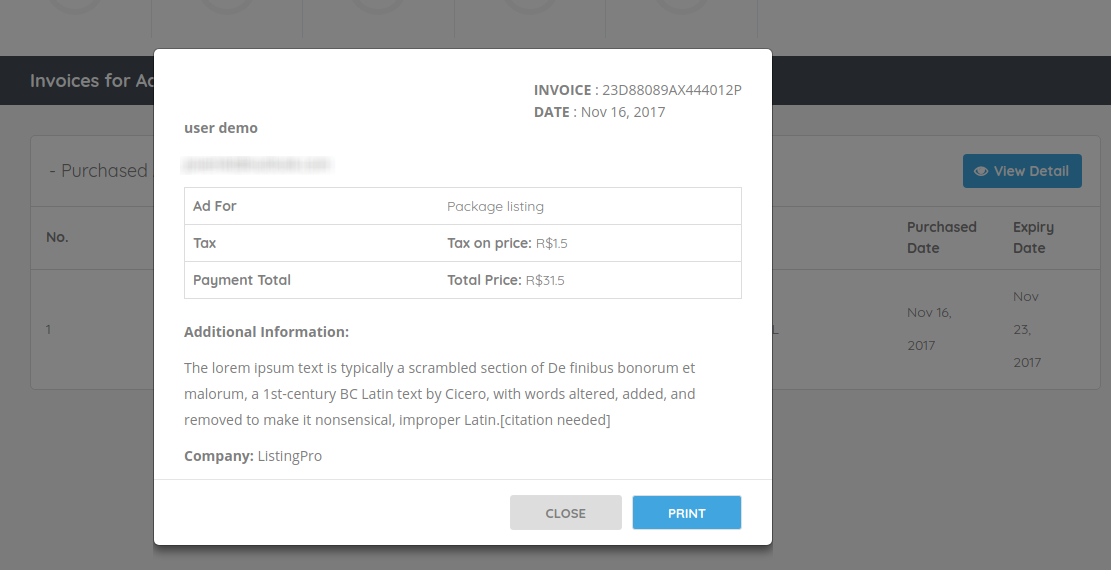
The detail shows us the name of the campaign, the tax (if included), and the total payment.

The additional information, admins can then create their own and insert more details about the procedure in case of refunds, terms & conditions, and any other important information that the admin considers important to include.

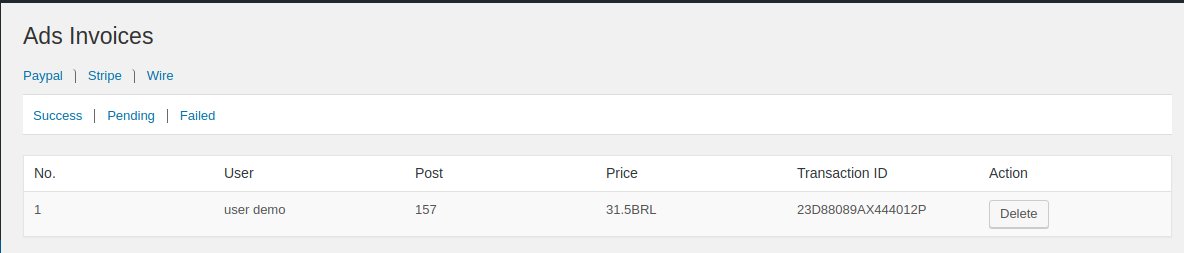
3 – Invoices showed in Admin Dashboard

You can see the invoice created for the Ad Campaign by going to WordPress Dashboard > Invoices > Ads Invoices


4 – Payment made through Wire Transfer

If the admin has decided to work with a wire transfer, customers after selecting the write transfer as their payment gateway, the final result will look like the screenshot below

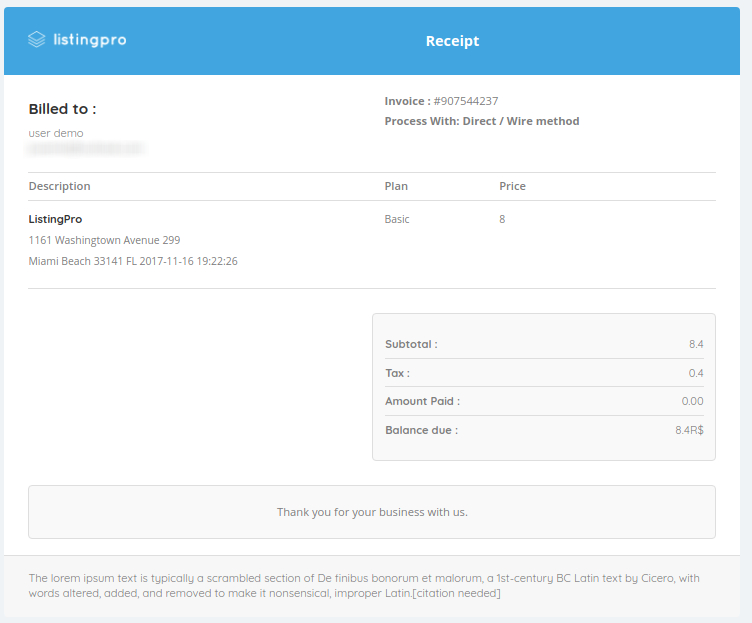
Admin can add more details about the invoice receipt by going to Theme Options > Invoice Options

Remember that the Wire Transfer details at the frontend, users should print and pay the respective plan. And admin should confirm if the payment was made. After this confirmation, the admin can follow step 5 below.

5 – Admin confirmation of the Wire Payment

After that, the admin will have to confirm with the bank account used to receive the payments, and after confirmed, admin should go to WordPress Dashboard > Invoices > Invoices and search for pending payments waiting for approval.

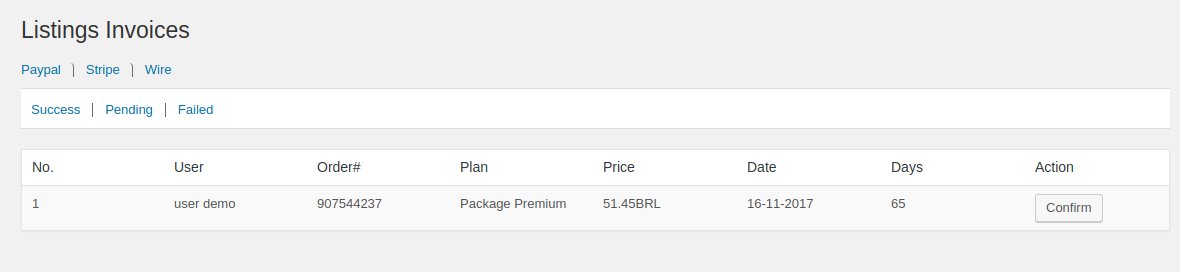
Here, we can see the Order# that was created, the Order# number is exactly the invoice receipt that the user has created while opting for paying through write transfer. After the admin confirmation, the Listing or/and Ad Campaign will be displayed in the Directory successfully.


What are the Support Timings?

Our support engineers will be available to help you during the following hour from Monday to Friday:

01:00 am – 11:00 am EST/EDT (US)
12:00 am – 10:00 am CST/CDT (US)
10:00 pm – 08:00 am PST/PDT (US)
05:00 pm – 03:00 am AEDT/AEST (AUS)
06:00 am – 04:00 pm GMT/BST (UK)
11:30 am – 9:30 pm IST (INDIA)

To convert this timing to your timezone, please go here.

Average Response Time: 3-6 Hours based on the tickets volume. Sometimes it may even take 24-48 Hours to get back to you, so please kindly bear with us.

After hours and on weekends there might be limited support available based on available resources. Please kindly bear with us while we respond to your questions and concerns.

How do the Taxes work in the Payment Plans?

In some countries, it’s required that businesses working with an advertisement or any type of activity that connects the Business to the Customer offering an Online Service, should be paying a certain amount of fee.

If it’s your case and your country determines that you have to pay the taxes for the specific city, state, country…

Let’s us explain how taxes may help you in this process.

First, let’s header to the Theme Options > Payment Settings > Tax Settings

As we can see, if we define our Tax Rate as 5, the taxes will be added to every purchase of listing or campaign.

Here, we’re going to include our taxes attached to our Pricing Plans. Later, we’ll show the result without adding it into the Pricing Plans, just to notice the difference between them.

I’ve defined one of the Plan as $8 for 15 days, and the Taxes which was set to include in our Pricing Plans will show the total value as $8.4

See screenshot below

Let’s then buy this Basic Plan, and see which information does it sends back while proceeding with the Checkout Payment.

The result is pretty satisfactory, as you can see the taxes have been included directly in the Checkout Payment.

Now, let’s see the same activity without implementing it into our Pricing Plans. Let’s see how it’s going to give us the Taxes Details.

See screenshot below

As we can see, the Taxes weren’t included in our Pricing Plans. Now let’s see if the result of the Checkout Payment will remain the same or if it’s going to change something in the user-end.

As we can see, nothing has changed in the Checkout Payment, but the minor changes were only noticed in the Pricing Plans.

You can change the Tax Title and include a better description that describes the Taxes on the payments, and also, a good option is to include an FAQ explaining in detail these Taxes.

It’s very important to include some information when it’s regarding the Terms & Conditions of the Business Directory.


How to add 2 time slots in Listing Business Hours?

ACTIVATING 2ND TIME SLOT FOR SUBMIT LISTING

To include the 2-time slots into the Submit Listing, first, go to Theme Options > Listing Settings > Listing Submit & Edit

Enable the 2-time slots as shown in the image below

Click on Save Changes

In case if your business has a defined weekday that works for 24hours, just click on the box and hit on the + Button to set the working hour for the day as “Open 24hrs“.


ATTENTION

It’s recommended to use the 24H format instead of 12H format. Also, operational hours with your language translation, the weekdays should be translated correctly, without word contractions. Use the standard weekdays’ translation.